
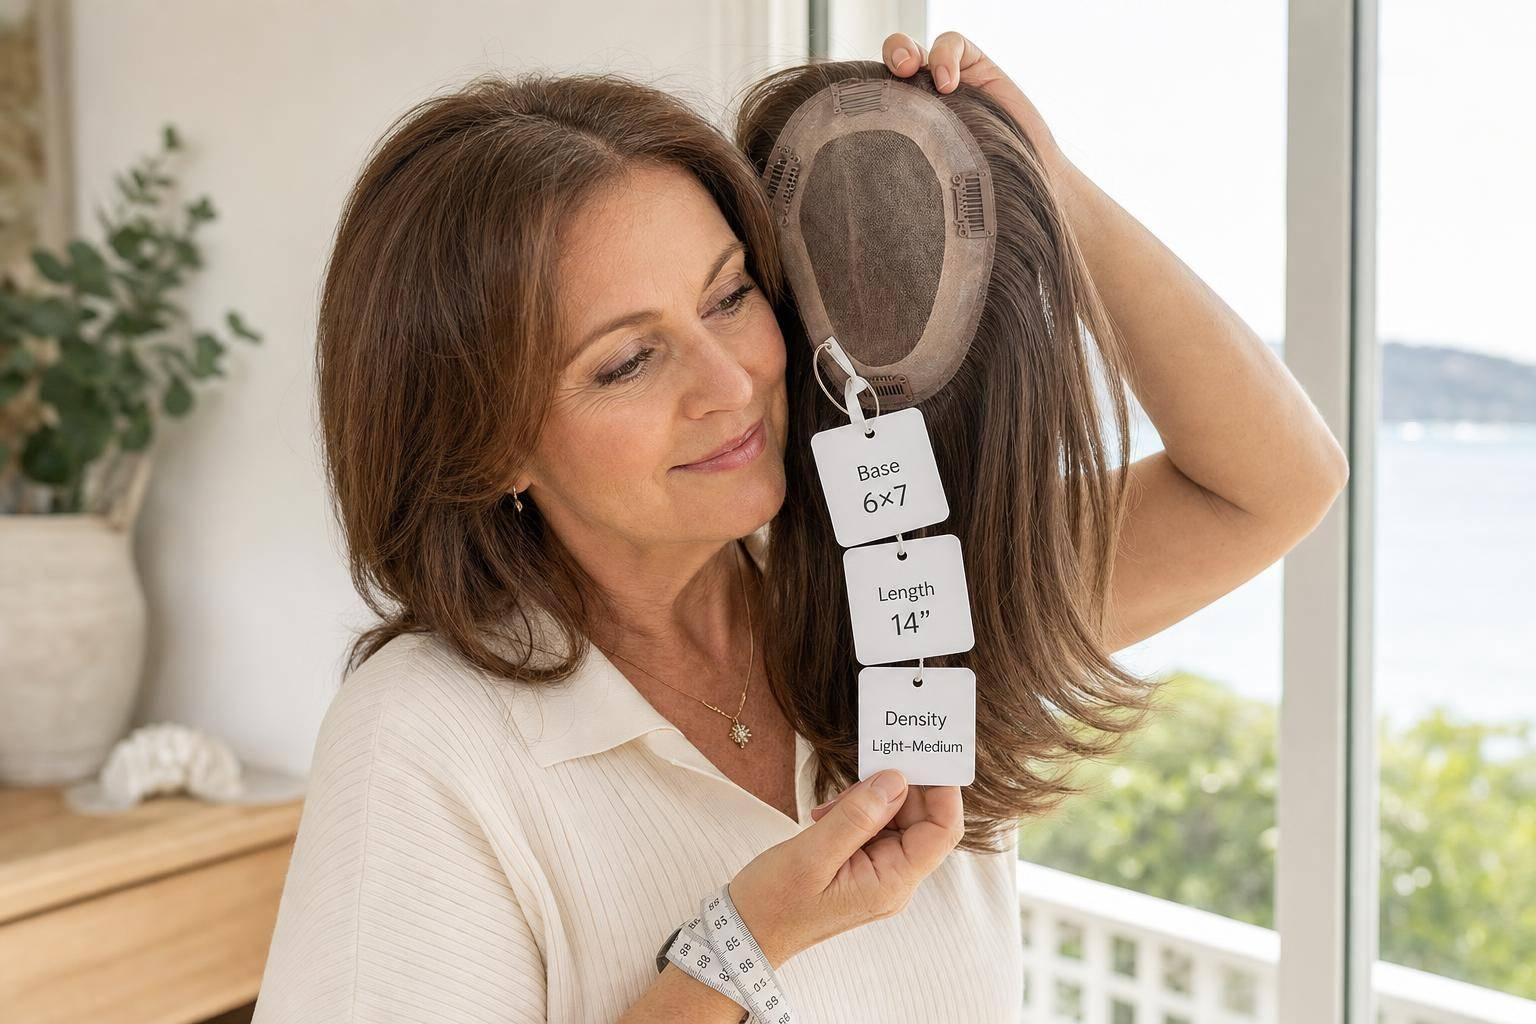
Hair topper size labels are simpler than they look: base size tells me how much scalp the piece covers, hair length tells me how long the strands are, and density tells me how thick the hair looks. If I read those three numbers in order - base first, length second, density third - I can avoid the most common buying mistakes.
Here’s the short version:
-
Base size = coverage
- A label like 5 × 9 cm means a small coverage area
- A label like 9 × 9 in means much more top-of-head coverage
- If I’m between sizes, I should usually go up one size
-
Hair length = strand length
- A label like 16 inches means the hair is measured from the top attachment point down to the ends
- I should measure from my crown to my ends
- It often helps to choose 2–5 cm longer for trimming and blending
-
Density = how thick it looks
- 100%–120% suits finer hair
- 130%–150% gives more volume without looking too heavy
- 180%+ suits thick hair or big styling
One thing catches many Australian shoppers out: listings often mix cm and inches. So I need to check what is being measured, not just the number.
| Label | What it means | What I should check |
|---|---|---|
| Base size | Size of the topper base | Does it cover the thinning area, plus clip room? |
| Hair length | Length of the strands | Will it match my own hair after trimming? |
| Density | Amount of hair on the base | Will it blend with the sides and back? |
Bottom line: if the base is wrong, coverage will be off. If the length is wrong, blending will be off. If the density is wrong, the topper can look too thick or too light for my own hair.
That’s the whole article in one quick check.
How to Read Hair Topper Sizes: Base, Length & Density Explained
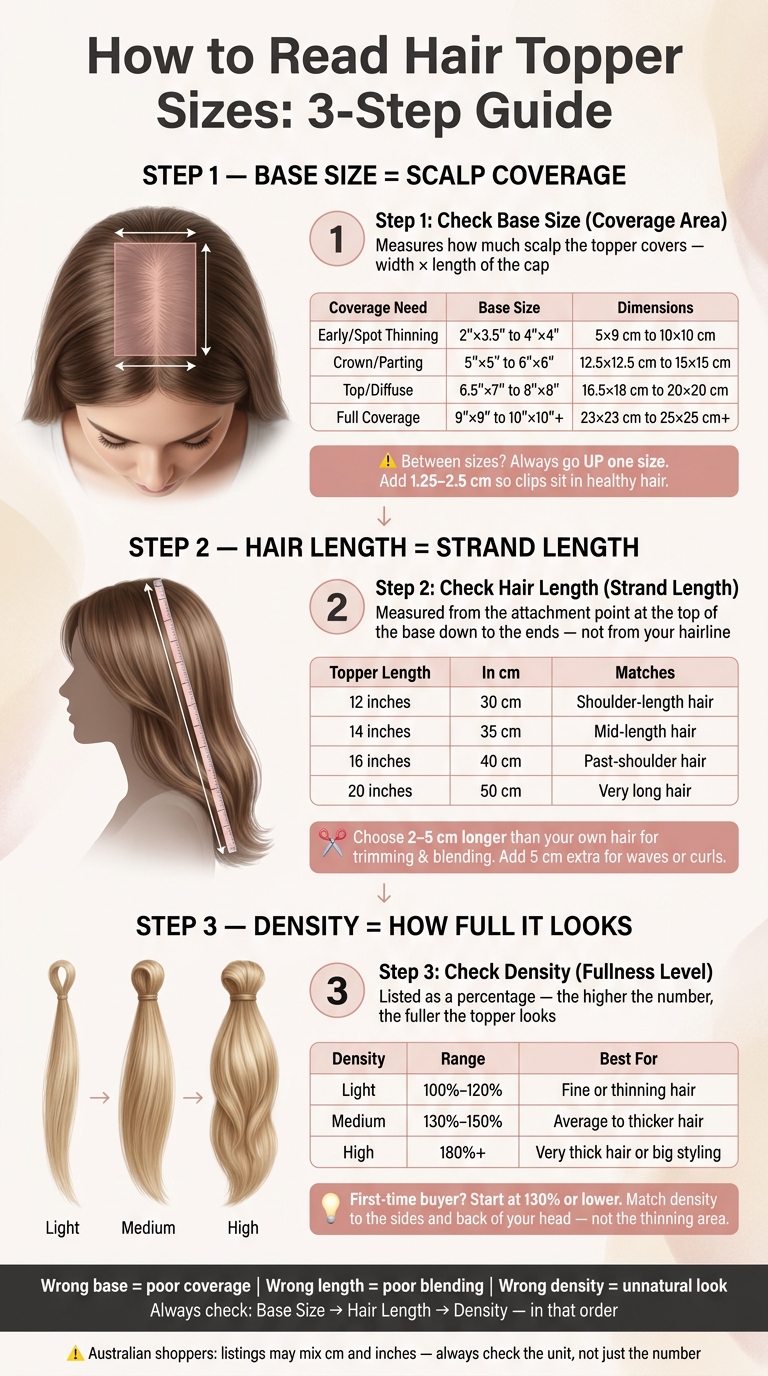
Step 1: Read the Base Size as Scalp Coverage
The base is the cap that sits on your scalp and determines the coverage area [2][1]. When you see a label like 5 × 9 cm or 9 × 9 inches, that’s simply the width × length of the cap. It tells you how much of the scalp the piece covers. It does not tell you the hair length.
How to measure your coverage area
Use a soft tape measure and stand in front of a well-lit mirror. You’re only measuring the area where thinning or lower density shows. Start with the widest point from side to side. Then measure from front to back, starting about 2.5–5 cm behind your hairline and going to the point where your hair density returns.
After that, add about 1.25–2.5 cm to both measurements. That extra room helps the clips sit in healthy hair instead of fragile thinning sections. If your measurements sit between two sizes, go with the larger base [3][1].
How to read common base labels like 5 × 9 cm and 9 × 9 inches
A 5 × 9 cm base is a small piece that works well for early or localised thinning, such as a synthetic hair topper with bangs. Think of a narrow part line that’s starting to widen. A 9 × 9-inch base - about 23 × 23 cm - is much larger and made for full coverage, especially for diffuse thinning across the crown and top of the head.
| Coverage Need | Base Size (Approx.) | Dimensions in cm | Use For |
|---|---|---|---|
| Early / Spot Thinning | 2" × 3.5" to 4" × 4" | 5 × 9 cm to 10 × 10 cm | Narrow part line, small crown spot |
| Crown / Parting | 5" × 5" to 6" × 6" | 12.5 × 12.5 cm to 15 × 15 cm | Widening part, moderate crown thinning |
| Top / Diffuse | 6.5" × 7" to 8" × 8" | 16.5 × 18 cm to 20 × 20 cm | All-over thinning on the top of the head |
| Full Coverage | 9" × 9" to 10" × 10"+ | 23 × 23 cm to 25 × 25 cm+ | Advanced or diffuse thinning, maximum volume |
Matching base size to the right Silkara Hair product
Smaller bases, such as 5 × 9 cm, are a good fit for early thinning or a part that’s getting wider. If you need more coverage, Silkara Hair’s large silk base human hair toppers - including the 9 × 9-inch option - cover the crown and top of the head in one piece. The silk base construction hides the knots between layers, so the hair looks like it’s growing straight from the scalp [2][1].
Once you’ve worked out the base size, the next thing to check is hair length.
sbb-itb-08feb2f
Step 2: Read Hair Length as the Length of the Hair Strands
Once you know your base size, look at hair length on its own. If a topper is listed as 10 inches or 25 cm, that measurement refers to the hair strands themselves, taken from the attachment point down to the ends.
How topper hair length is measured in inches and centimetres
Topper hair length is measured straight from the attachment point at the top of the base down to the ends of the strands. So a 16-inch (40 cm) topper has hair that falls from that top attachment point to the ends [2].
How to match topper length to your own hair
To work out the right length, grab a soft tape measure and measure from your crown, where the topper will sit, straight down to the ends of your own hair. That gives you your starting point.
From there, it's usually best to choose a topper that is 2–5 cm longer than your natural hair [2]. Why? Because that extra length gives your stylist room to trim and shape the piece so it blends into your own cut and layers.
If you want to wear the topper wavy or curled, leave about 5 cm extra. Waves and curls can make the hair look shorter than it is [7].
| Topper Length | In Centimetres | Approximate natural hair length |
|---|---|---|
| 12 inches | 30 cm | Shoulder-length hair |
| 14 inches | 35 cm | Mid-length hair |
| 16 inches | 40 cm | Long hair reaching past the shoulders |
| 20 inches | 50 cm | Very long hair |
How topper length differs from halo, clip-in and ponytail extension length
This is where people often get caught out. The number may be the same, but the finished look won't be.
A topper sits at the scalp, so its listed length runs from the top of your head down to the ends. Halo hair extensions, clip-in extensions and ponytail extensions attach lower on the head, so the same inch measurement won't fall to the same spot [1].
Once you’ve sorted the length, the next thing to check is density, which affects how full the topper looks.
Step 3: Read Density as How Full the Topper Will Look
Density tells you how much hair is added to the topper base. It’s usually listed as a percentage, like 100%, 130% or 150% [1]. Put simply: the higher the number, the fuller the topper will look.
What density percentages mean in practice
You’ll usually see density shown as a percentage in product listings. Here’s how those ranges tend to look in day-to-day wear:
- 100%–120% looks softer and works well for fine or thinning hair [1].
- 130%–150% gives you more volume while still blending in nicely [1].
- 180%+ gives the most thickness and suits very thick hair or bigger styling looks [1].
If this is your first topper, 130% or lower is a safe place to start [1]. Go too dense compared with your own hair, and the topper can end up looking like it’s sitting on top instead of blending in [1].
How base size and density affect each other
Base size and density need to work together. That balance matters more than many buyers expect.
A larger base with very low density can look thin or a bit see-through. On the other hand, a small base with very high density can look bulky or less natural [1].
There’s also the weight factor. Higher density means more hair, and more hair means more weight. So the anchor hair needs to be strong enough to hold it well [4].
Choosing the right density for your hair type
When picking density, match it to the hair on the sides and back of your head, not the thinning area on top [6]. That’s the hair your topper has to blend with, so it’s the better guide.
| Density Label | Percentage Range | Visual Effect | Best for |
|---|---|---|---|
| Light | 100%–120% [1] | Soft, easy to blend | Fine or thinning bio hair |
| Medium | 130%–150% [1] | Full and lush, realistic volume | Average to thicker bio hair |
| High | 180%+ [1] | Maximum thickness | Very thick bio hair or high-volume styling |
If you choose a human hair topper and it feels too full, it can be thinned a little if needed [5].
With this part sorted, you’re ready to look at base size, length and density together before buying.
Putting It All Together: Choose Base Size, Length and Density with Confidence
Use these three labels in this order: base size, length, then density. Start with coverage. Then look at blend. Then check fullness.
A simple 3-step check before you buy
Start with base size. Measure the thinning area, then add 0.5 to 1 inch (1.3 to 2.5 cm) so the clips sit in stronger hair [1][3]. If your measurements land between two sizes, go up to the next size [3][1]. Once coverage looks right, move on to hair length.
Next, check hair length. Compare the listed length with your own hair so the topper blends at the ends. A lot of people buy a slightly longer piece and trim it for a more custom finish [2]. After that, look at density.
Finally, check density. The goal is to match the fullness of your own hair so the topper blends in well. Common options are 130%, 150% and 180%+, with 150% suiting most first-time buyers [1][6].
How Silkara Hair helps you get the right match
Silkara Hair helps with colour matching, base sizing and density selection through detailed product photos, photo-based colour matching, and an AI try-on tool on selected products.
Conclusion: The three labels to check on every topper
Every topper listing comes down to three numbers: base size, hair length and density. Check them in that order, and you'll have a much clearer idea of whether the piece covers well, blends with your hair and looks balanced.
FAQs
How do I measure my thinning area correctly?
Style your hair the way you usually do first. That makes it much easier to spot the area that needs coverage.
Then use a soft tape measure to check the thinning area:
- measure from front to back
- measure from side to side at the widest part
After that, add 1 to 2 cm to both numbers. This extra space gives the topper clips room to grip healthy hair around the edges instead of tugging at thinner spots.
What if I’m between two topper base sizes?
If you're choosing between two topper base sizes, it's usually best to go up a size. A slightly larger base gives you more room to work with, makes it easier to place the clips into strong, healthy hair, and tends to blend better than a base that's too small.
A good rule of thumb is to pick a size that covers your thinning area plus an extra 1–2 cm around it. That extra margin gives the clips enough space to grip hair with decent density, so the topper sits more securely.
How do I choose the right density for my hair?
Match the topper’s density to the healthiest, fullest part of your natural hair so it blends in cleanly.
- 130%: natural, light-to-medium fullness for fine hair
- 150%: a good all-round pick for medium hair
- 180%: best for thicker hair or if you want a fuller look
If you’re not sure, 150% is usually the safest place to start.