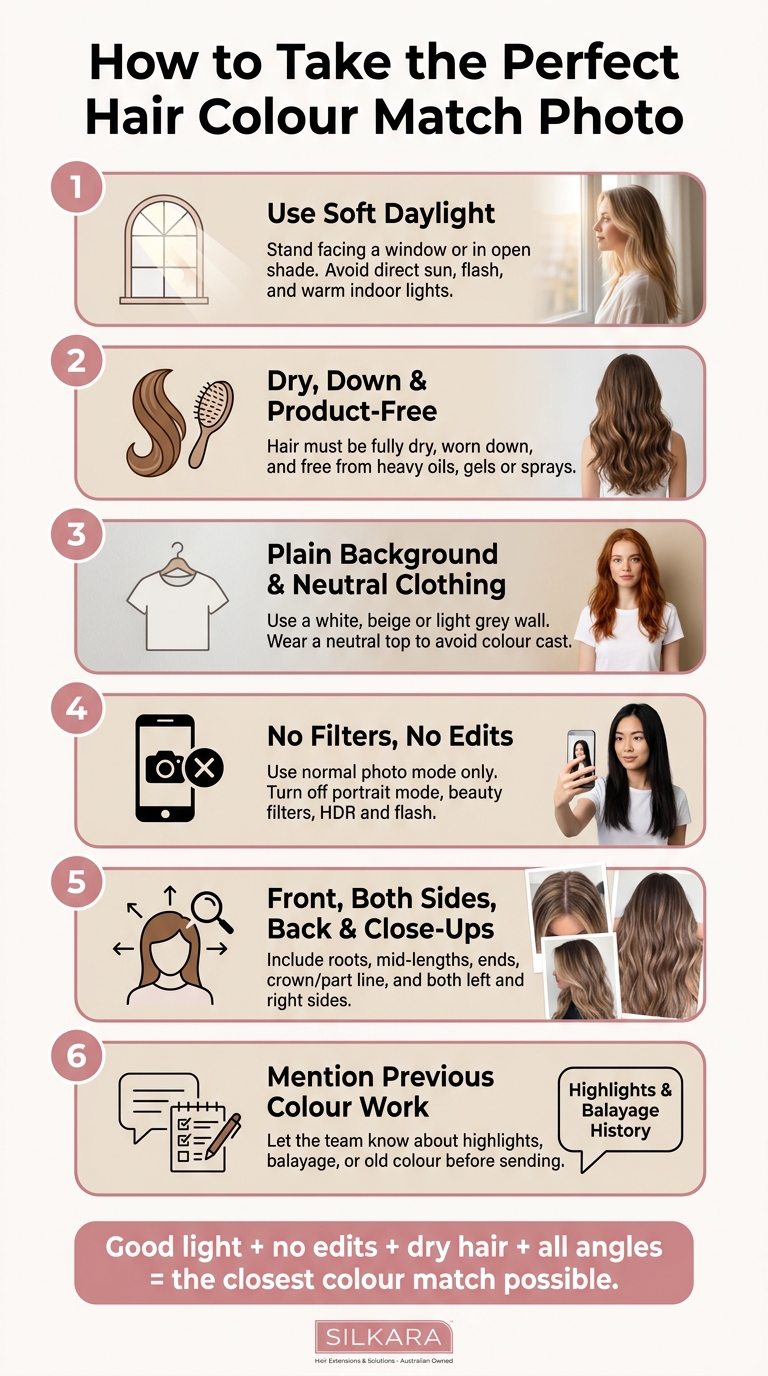
Most colour match problems start with the photo, not the hair. If I want the closest match for hair extensions, I need to send clear, unedited photos in soft daylight, with my hair dry, down, and shown from more than one angle.
Here’s the short version:
- Use soft daylight near a window or in open shade
- Avoid direct sun, flash, backlighting, and warm indoor lights
- Keep hair dry and product-free
- Wear neutral clothing and stand in front of a plain background
- Use normal camera mode only with no filters or edits
- Send front, both sides, back, and close-up shots
- Show the mid-lengths and ends, because that’s where the blend usually matters most —especially when fitting halo hair extensions or clip-ins.
A phone is enough. In fact, with today’s cameras, most people already have what they need. The main thing is setup. Even a small lighting shift can change how blonde, brunette, grey, or balayage tones look on screen. That matters because hair can show more than one tone at once from root to end.
If I’ve had highlights, old colour, or balayage, I should say so when I send the photos. That gives the team a better view of what needs to match first.
So if I want a closer colour match, I should keep it simple: good light, no edits, dry hair, plain background, and all the key angles.
How to Take the Perfect Hair Colour Match Photo
How to choose lighting that shows your real hair colour
For the most accurate colour-matching photos, use soft, indirect daylight. Once your lighting is right, you’ve got a much better shot at showing your hair’s true tone.
Use soft daylight near a window or in open shade
The most reliable setup is indirect natural daylight. If you’re indoors, stand facing a window so the light falls across the front of your hair. If you’re outside, look for open shade, like under a covered area or next to a building, where the light is bright but diffused.
Both setups help your hair appear in soft, even light. That makes it easier to see its true depth and undertone without colour distortion.
Face the light source so your hair is lit evenly from root to tip. This helps show the mid-lengths and ends clearly for colour matching.
Avoid direct sun, backlighting and yellow indoor lights
Direct midday sun is harsh. It can blow out highlights, create heavy shadows, and make hair look lighter or warmer than it is.
Standing with a window behind you causes the opposite issue. Your hair drops into shadow and can look darker or harder to judge.
Warm indoor lights can also add an orange or golden cast that isn’t there in person, which makes colour matching less reliable.
With lighting sorted, move on to hair, clothing and background.
sbb-itb-08feb2f
How to prepare your hair, background and phone before taking photos
Before you take any photos, set things up properly. That gives the Silkara Hair team a much clearer view of your colour, tone and how the blend should look.
Wear your hair down and show its natural texture
Make sure your hair is fully dry before you take photos. Wet hair tends to look darker and shinier than it is, which can throw off the colour check straight away [5].
Wear your hair down and brush it through so the full length and natural texture can be seen [1]. The main area to show is the mid-lengths and ends, because that’s where the blend matters most [2][3].
It also helps to skip heavy oils, gels and sprays before taking photos. Those products can make hair look darker or flatter than it looks in person [5].
Use a plain background and neutral clothing
Stand in front of a plain white, beige or light grey wall or door. Wear a neutral-coloured top too, so your clothes or background don’t cast extra colour onto your hair [5].
Turn off filters and use standard photo mode
Use standard camera mode only. Portrait mode, beauty modes and auto colour correction can blur edges, smooth texture and shift undertones [3][5].
Leave brightness, saturation, contrast and exposure alone as well. Even small edits can make it harder to judge your real shade. A light crop or straightening the image is fine.
Once everything is set up, move on to the front, side and back shots next.
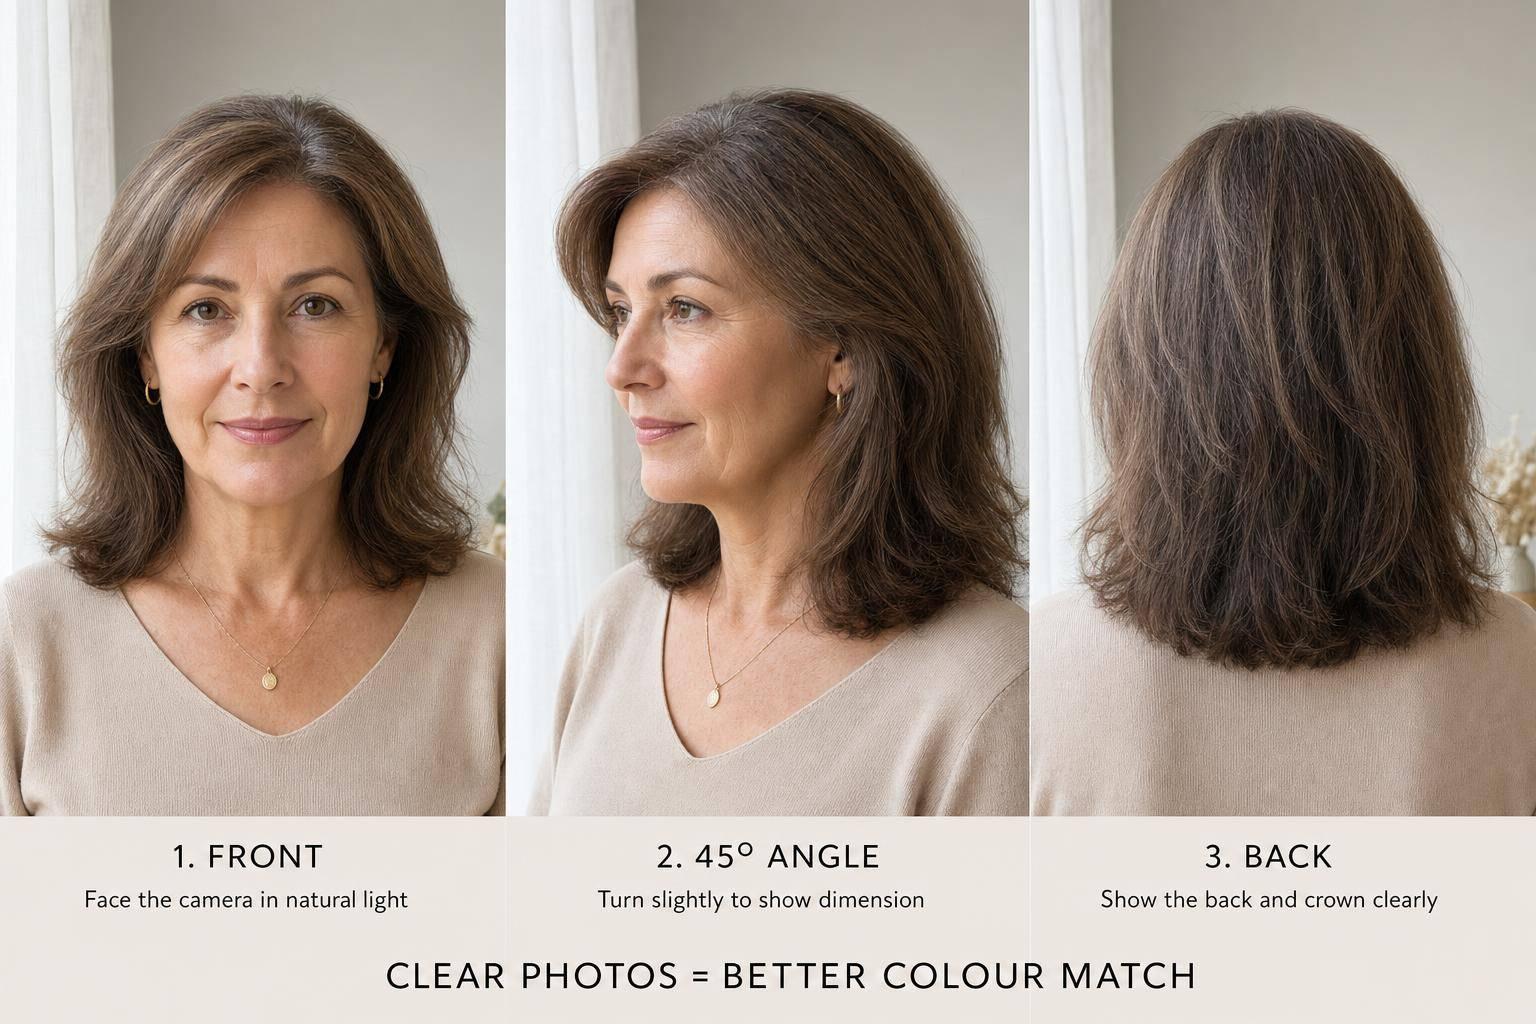
The key angles to photograph for colour matching
Once your lighting and prep are done, take photos from the front, both sides, the back, and a few close-ups. Those angles give the clearest view of your colour and make matching much easier.
| Angle | What to show | Useful for |
|---|---|---|
| Front | Roots, hairline and face-framing layers | Clip-in bangs, fringes, halos and clip-ins |
| Side (left & right) | Light reflection, highlights, lowlights and mid-length blend points | Halos, clip-in sets and tape-ins |
| Back | Full length, overall colour consistency and natural density | Ponytail extensions, halos and full-head clip-in sets |
| Close-up (crown/part line) | Root colour, part width and thinning areas | Human hair toppers and thinning hair solutions |
| Close-up (ends) | Exact tip shade and colour fade | Clip-in extensions, halos and ponytail extensions |
Front, left and right photos for shade and face-framing blend
For the front photo, face the camera with your hair down. This shot shows your roots, hairline, and how the colour sits around your face [4].
Then take a photo of each side. Left and right matter because hair doesn’t always reflect light the same way on both sides. One side might show highlights, lowlights, or blend lines that barely show in the front shot [4][3].
Back photo for full length, density and blending area
Take one back photo that shows your hair from root to tip. This makes it easier to see density through the length, along with any fade or shift in colour toward the ends [1][4].
Close-up photos of the crown, part line, hairline or ends
Close-ups help fill in the small details that wider shots can miss. For a human hair topper, a top-down photo of your natural part helps show part width and root depth [4][5].
If you have regrowth, grey strands, or balayage, take a close-up of the transition zone too. That gives a clearer view of how the tones change through the hair [4]. For clip-in bangs or fringes, move the hair back a little so your natural hairline is visible, along with any grey regrowth that needs to blend in [4].
Before sending the photos, check the common photo mistakes below.
Common photo mistakes and how to fix them before you send
Before you send your photos, give them a quick check. A few small issues can make it harder to assess your hair colour properly.
| Common mistake | Quick fix |
|---|---|
| Harsh sunlight or shadows | Move to soft, indirect daylight near a window or in open shade. |
| Yellow or warm indoor lights | Turn off indoor lights and use natural daylight instead. |
| Hair tied up in a bun or ponytail | Wear your hair down from root to tip. |
| Filters, flash or HDR settings | Use standard photo mode with no filters or flash. |
| Only sending one angle | Send front, back and side photos, plus close-ups. |
| Dark or busy clothing | Wear neutral-coloured clothing against a plain background. |
If you’ve had any colour work done before, mention it when you send your photos. That includes old colour, highlights, or balayage. This matters because the mid-lengths and ends should be matched first. Roots are usually darker, so they’re not the best place to start.
Send clear, unedited photos in natural light, with your hair down and from a few angles.
FAQs
What if I can only take photos indoors?
If you can only take photos indoors, stand about 30 to 60 centimetres from a window with soft, indirect natural daylight. Switch off artificial lights, including overhead lights and lamps, because they can add blue or yellow tones and throw off how your hair colour looks.
Skip direct sunlight too. It can wash out the photo or create harsh shadows. This helps the Silkara Hair team see your hair’s true tones more clearly.
Should I mention highlights or old colour?
Yes. Please mention if your hair has highlights, lowlights, or if you’re transitioning from an old colour.
That gives the Silkara Hair team a better sense of your current shade, because hair is rarely just one flat colour. For the best match, make sure your photos are clear, taken in natural light, and show your hair worn down from root to tip so those differences are easy to see.
Which part of my hair matters most to match?
For the most natural blend, match the mid-lengths and ends of your hair instead of your roots. Roots are often darker because of new growth and less sun exposure. The ends, on the other hand, are usually the most visible spot where extensions or toppers need to blend in.
If you usually wear your hair up, like in a ponytail, matching closer to your roots can work better. Otherwise, matching the mid-lengths usually gives the smoothest transition.