Articles

6 Ways to Match Hair Extensions to Natural Hair Color
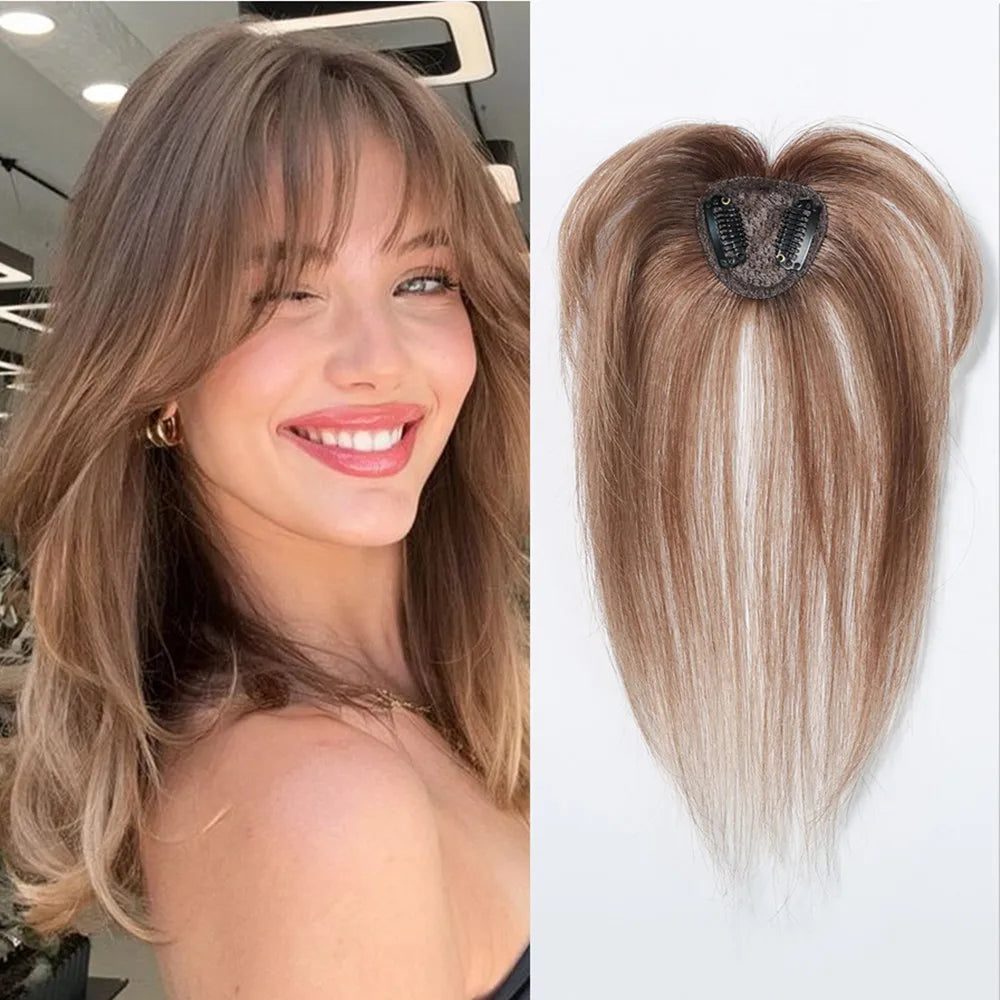
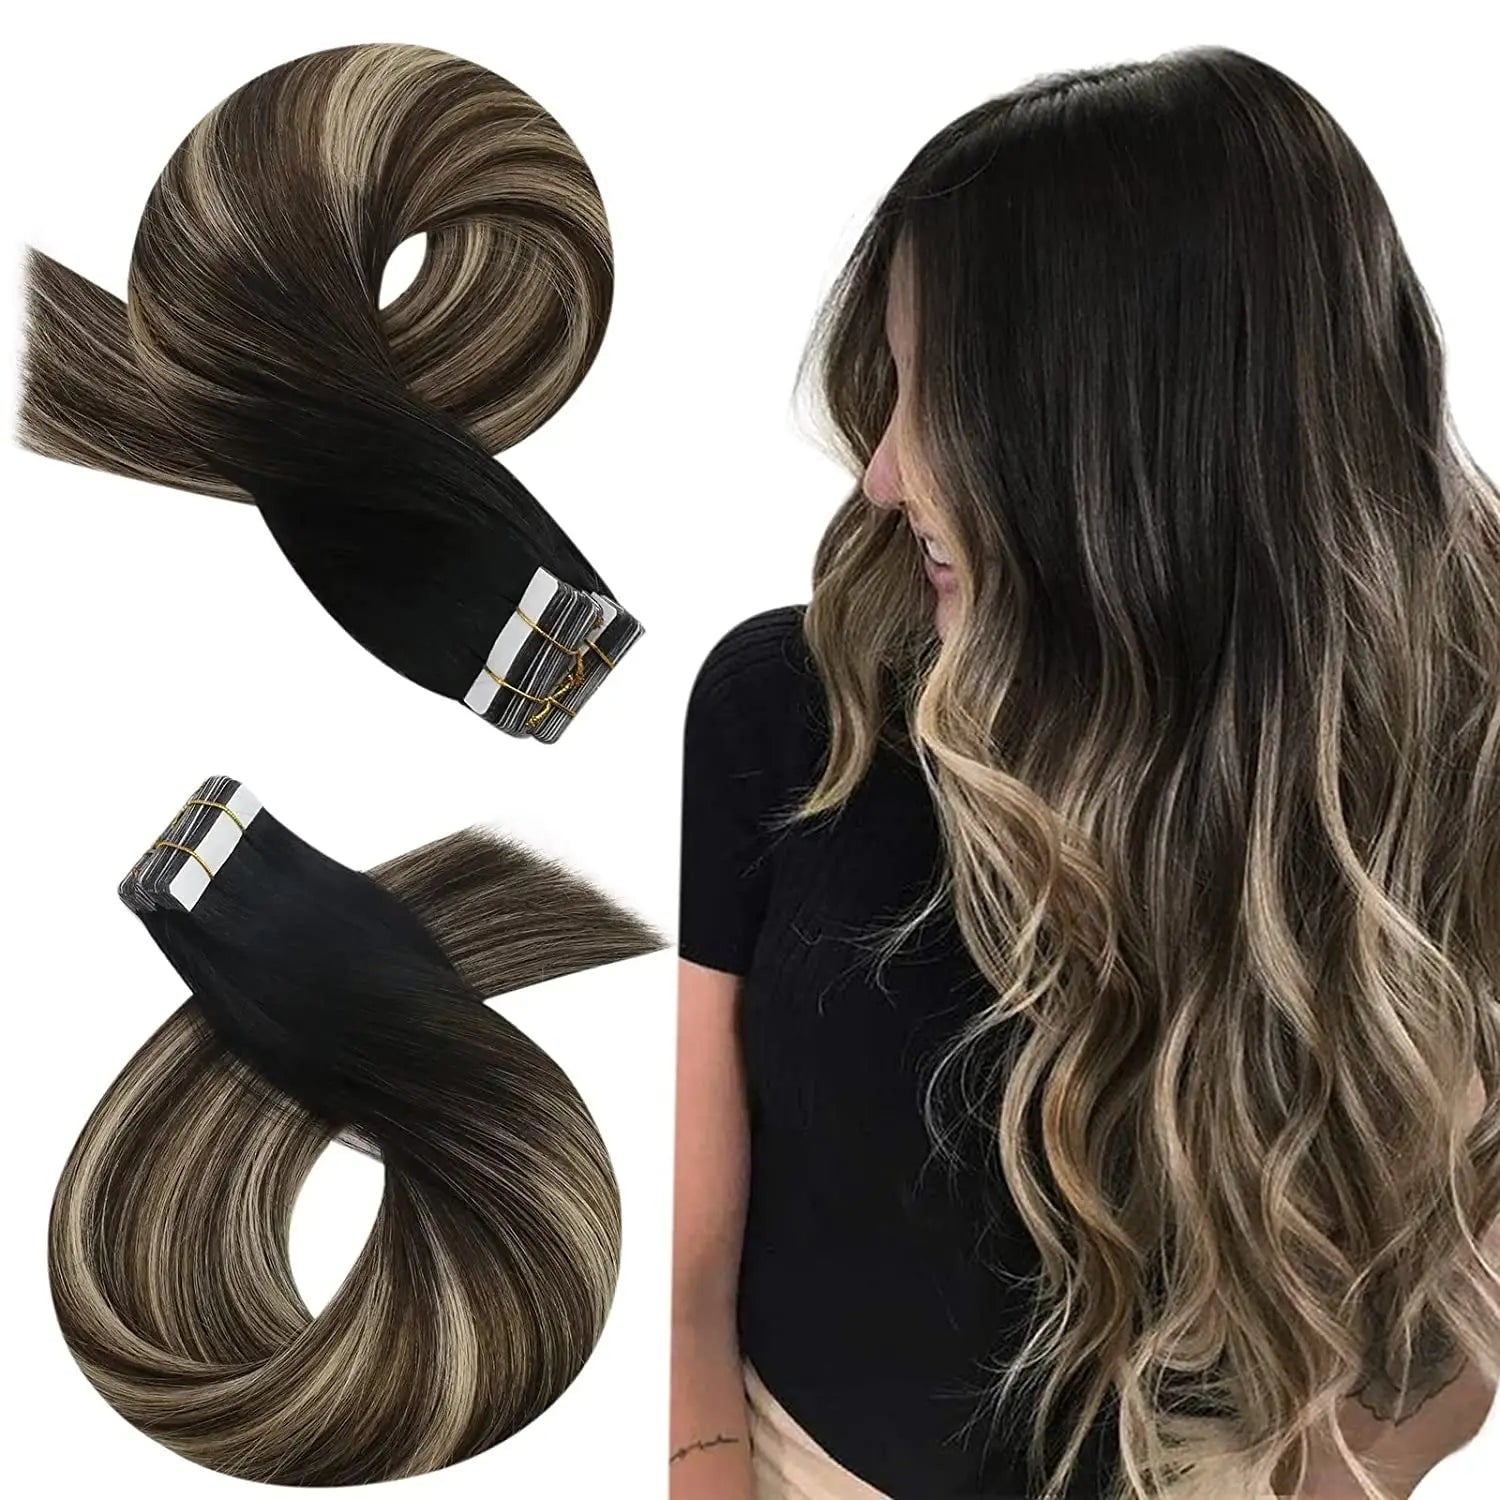
Getting the right colour match for your hair extensions is crucial for a natural look. Even slight mismatches can make extensions stand out. Here’s a quick guide to ensure your extensions blend perfectly: Check Your Hair in Natural Light: Avoid artificial lighting as it can distort your hair's true colour. Use Colour Swatches: Compare small samples of extension shades against your hair to find the closest match. Opt for Multi-Tonal Extensions: Natural hair often has highlights and lowlights. Choose extensions with similar variations for a more realistic look. Seek Professional Help: A stylist can custom-match extensions to your hair and even blend multiple shades for a seamless finish. Try Virtual Colour Matching Tools: Upload photos of your hair to online tools for shade recommendations and previews. Adjust Extensions with Toners: Use toners or treatments to fine-tune the extensions to your hair's tone. Why It Matters Matching extensions to your hair ensures a smooth blend, making them undetectable. Use these tips to achieve a polished, natural look that boosts your confidence. Let’s dive into each method for more details. How To Colour Match Extensions To Your Clients Natural Hair 1. Check Your Hair Colour in Natural Light Getting the right match for your hair extensions starts with knowing your actual hair colour - and that means steering clear of artificial lighting. Indoor lights can throw off your perception, making your hair look warmer or cooler than it really is. Use Daylight for a True Match Natural sunlight is your best bet for seeing your hair's real colour. Unlike artificial lighting, which can distort tones, daylight gives you an accurate view. Step outside or stand by a window during daylight hours - mid-morning to early afternoon works well - to examine the mid-lengths and ends of your hair. This is where the true tone shines through. "When evaluating your natural hair colour for extensions, always examine your hair in natural light to confirm an accurate shade match. Indoor lighting can distort your hair colour, making it challenging to find a perfect match." By understanding your hair's natural tone, you'll be better equipped to find extensions that blend seamlessly. Why Indoor Lighting Can Mislead You Artificial lighting can play tricks on your eyes. Fluorescent lights tend to make hair look cooler, while incandescent bulbs add warmth. Even LED lights, which vary in colour temperature, can misrepresent your hair tone. Some LEDs lean warm, others cool, leading to potential mismatches when selecting extensions. If you absolutely must check under artificial lighting, opt for neutral-tone LED lights. Still, nothing beats the accuracy of natural daylight for assessing your hair colour. "Lighting plays a crucial role in determining your true hair colour. Always check your natural hair under natural daylight before selecting your extension shade. This will prevent mismatched tones and ensure a seamless blend." Using natural light as your guide ensures you’re starting with a solid foundation for matching your extensions perfectly. 2. Use a Colour Matching Swatch A colour swatch is a small sample of hair dyed to a specific shade and tone, designed to help you compare it against your natural hair under different lighting conditions. It gives you a chance to preview the colour before making a commitment. Choosing the Right Swatch Set Silkara Hair offers colour swatches that allow you to see how a specific extension shade blends with your natural hair. When picking swatches, you can opt for either a full colour ring showcasing all available shades or individual swatches if you're focusing on just a few specific colours. Start with a colour match assessment and order three swatches to pinpoint your best match. If you're stuck between two shades, it’s usually better to pick the lighter one. Extensions can be toned to match your hair more closely, but darkening them is far trickier. Matching Swatches to Your Hair's Mid-Lengths and Ends The most accurate colour match comes from focusing on your hair’s mid-lengths and ends. Roots tend to be darker due to natural growth patterns, so these sections better reflect your hair’s true colour. To compare, clip up the top layer of your hair and hold the swatch against the hair behind your ears. Check the match in natural light, viewing it from multiple angles to ensure it blends seamlessly from every perspective. For an even better preview, brush the swatch into your hair. This step shows how the extensions will sit and move naturally with your hair. Multi-tonal shades often provide a more natural look than solid colours, as they complement the depth, highlights, and subtle variations already present in your hair. "Forget guessing your shade or settling for a similar but not 100% exact colour. With our Colour Swatch Samples, you can visualise the exact shade of the Hair Extensions next to your natural hair with complete confidence, ensuring an accurate match and seamless blend every time." – Lullabellz US After completing your swatch comparison, consider multi-tonal extensions to add even more natural dimension to your look. 3. Blend Multi-Tonal Extensions for Natural Dimension Natural hair rarely comes in one flat colour. It often features soft highlights, lowlights, and tonal shifts that add depth and movement. Multi-tonal extensions mimic these natural variations by combining different shades to replicate the dimensional look of highlighted or sun-kissed hair. Here are some practical ways to blend extensions and enhance your hair's natural depth. Create Depth with Multi-Tonal Shades To make extensions blend seamlessly with your natural hair, layering different coloured extensions is key. Instead of relying on a single shade, choose extensions that match your dominant hair tone and pair them with complementary colours to replicate highlights and lowlights. This technique helps create a more natural, dimensional effect. For instance, combining Chestnut Brown and Dirty Blonde extensions can produce a warm, honey-toned look that mimics sunlit hair. Professional stylists often use 22-inch Hybrid Wefts to achieve this effect. A popular method involves layering a bottom row of balayage extensions, followed by middle and top rows in Dark Chestnut/Medium Ash, topped with Rooted Ombre for added depth. The real magic of multi-tonal blending lies in its ability to create a natural, harmonious finish that feels cohesive and authentic. Achieve a Sun-Kissed Look with Balayage Extensions Balayage extensions are another fantastic way to add natural highlights without resorting to chemical treatments. These hand-painted extensions are designed to mimic the soft, sun-kissed tones of naturally lightened hair. The goal with balayage is to create a subtle, gradient effect, as though the sun has gently brightened your hair over time. Unlike traditional highlights, which can sometimes look harsh, balayage creates smooth, seamless transitions by blending lighter tones into your natural colour. When selecting balayage extensions, consider the specific highlighting technique already present in your hair - whether it’s balayage, ombre, or traditional foiling. Choose extensions that match your hair's lighter tones and gradients to enhance your overall look. Once installed, styling with heat tools can help blend the extensions further, ensuring a flawless transition between your natural hair and the extensions. This approach not only enhances your hair colour but also ensures the extensions look completely natural. 4. Get Professional Help for Custom Matching When it comes to achieving a seamless hair extension match, professional expertise can be a game-changer - especially for those with complex colour combinations or unique tones. While at-home methods can work for many, professional help ensures an unmatched level of precision, offering solutions tailored to even the most challenging shades. Why In-Salon Colour Matching Stands Out Professional stylists bring years of training in colour theory and a deep understanding of hair texture, tone, and history. In a salon, they use tools like colour rings to match extensions to your hair and may even order multiple shades to create natural-looking highlights and lowlights. They don’t just stop at surface-level matching - they analyse your hair under different lighting conditions, sometimes using UV lights to check for accuracy. Swatch tests are another tool they use to ensure your extensions look consistent, whether you're under natural sunlight or indoor lighting. Unlike at-home methods, professionals also account for factors like hair porosity, which studies suggest is responsible for a significant number of mismatches. Custom Solutions for Unique Hair Colours For those with particularly distinctive hair shades, custom extensions offer a personalised answer. Through custom blending, stylists mix several shades and textures to mimic the exact depth, dimension, and tone of your natural hair - something standard extensions simply can’t achieve. During this process, stylists carefully evaluate every detail of your hair, from highlights and lowlights to texture and reflectivity. Beyond just colour, they can cut and style the extensions to align with your existing haircut, ensuring the length, layers, and texture blend seamlessly. Toners are often used to address unwanted undertones, enhance dimension, and create a cohesive look between your natural hair and the extensions. If you’re considering custom work, it’s helpful to bring reference photos of your desired colour and style to your consultation. Ask the salon about their colour-matching process and the types of dyes they use, especially if you have a sensitive scalp. Specialists in colour correction are particularly skilled at matching extensions to unique tones. For those purchasing extensions online but still seeking professional input, many brands now offer video consultations. This allows you to show your hair colour live to a trained expert, combining the ease of online shopping with the reassurance of professional advice. It’s a great way to avoid costly mistakes and ensure your extensions perfectly complement your hair. sbb-itb-08feb2f 5. Use Virtual Colour Matching Tools Virtual colour matching tools have taken the guesswork out of finding the perfect extension shade. These tools analyse uploaded photos to recommend shades tailored to your hair's unique characteristics. For instance, Silkara Hair's virtual colour match service offers personalised shade suggestions, helping you avoid the frustration of mismatched colours before making a purchase. By following detailed photo guidelines, you can achieve a seamless match with minimal effort. What makes virtual matching so effective is its combination of convenience and precision. Rather than relying solely on how colours appear on your monitor, these tools extract actual colour data from your photos. Many users find this process a helpful first step before consulting with a stylist. Upload Photos for Accurate Colour Analysis For virtual matching to work effectively, high-quality photos are essential. Position yourself near a window with indirect sunlight to capture your hair's true colour tones. Make sure your hair is clean, dry, and smooth. Pull it forward to show the full length, from roots to ends, and avoid tucking it behind your ears to ensure all natural colour variations are visible. Submit at least three clear, well-lit photos from different angles, including one from the back, to give the tool a complete view of your hair. Avoid using flash or filters, as they can distort your hair's actual colour. Meeting these photo standards ensures the algorithm can process your images accurately, giving you the best possible results. Use Augmented Reality to Preview Results Once your photos are ready, augmented reality (AR) tools take things to the next level. These advanced systems overlay extension images onto your photos, allowing you to see how different shades and styles will look with your natural hair. By factoring in your hair's angle and lighting, AR tools create a realistic preview of potential matches. Silkara Hair's virtual colour match tool uses this technology to let you experiment with various extension colours, lengths, and methods. This feature not only ensures precise colour matching but also helps you visualise styling options, making it a valuable resource for salon consultations. Sharing your virtual results with your stylist can streamline discussions about colour, length, and application methods. While these tools are highly advanced, the accuracy of the results often depends on the quality of the photos you provide. Virtual matching is an excellent complement to other colour-matching techniques, offering a strong foundation for achieving your desired look. 6. Adjust Extensions with Toners and Treatments After purchasing extensions, small adjustments can make a big difference in achieving a flawless blend. Toners and specialised treatments allow you to fine-tune the colour of your extensions, helping to neutralise unwanted undertones, refresh faded hues, or even create custom shades not available in pre-made options. These tweaks ensure your extensions perfectly align with your hair's tone for a natural look. The success of these adjustments depends on understanding your extension material and using the right techniques. For instance, 100% Remy human hair extensions respond well to toners and treatments, while synthetic extensions cannot be coloured at all. Before making any changes, always check with the manufacturer and test the product on a small section of the extensions. "Before you begin the coloring process, make sure the hair extensions set you chose is 100% Human hair extensions, as synthetic hair cannot be colored." - Irresistible Me Use Toners to Correct Undertones Toners act like a colour-correcting filter, helping to neutralise brassy or yellow undertones that might make your extensions stand out from your natural hair. They’re especially handy when your extensions are close to your natural shade but have slight undertone mismatches. "Hair toner is a product, semi-permanent hair colour or toning shampoo, that is used to neutralise or enhance certain tones in the hair." - Doctored Locks To prepare, wash your extensions with a sulfate- and alcohol-free shampoo to remove any pre-conditioning treatments that could block the toner from absorbing properly. Extensions with fabric bases tend to accept toner better than seamless extensions with silicone bases. When applying toner, ensure even coverage by working systematically, applying it evenly on both sides of the weft in a downward motion. Always test the toner on a small section first, as extension hair may process colour differently than your natural hair. After toning, follow up immediately with a deep conditioning treatment to restore moisture, as toners can dry out the hair. Maintain Colour with Purple or Blue Shampoo Once you’ve toned your extensions, keeping the colour fresh is key. Purple and blue shampoos are great for ongoing colour maintenance. Purple shampoo neutralises yellow or brassy tones in blonde, silver, or highlighted hair, while blue shampoo works on orange, red, or copper tones in lightened brunette hair. These shampoos work gradually, making them perfect for maintaining your colour match over time. Because extensions absorb these shampoos quickly, it’s important to dilute them. Mix the shampoo with water before applying to avoid over-toning or uneven results. Extensions can pick up the pigment in as little as 30 seconds, so timing is crucial. Start by washing your extensions with a sulfate-free shampoo, then apply the diluted purple or blue shampoo. Use gentle squeezing motions and wipe downward for 1–2 minutes before rinsing thoroughly. Always rinse with warm water until it runs completely clear, then follow with a deep conditioning treatment to keep the extensions hydrated. Pigmented shampoos can be drying, especially since extensions don’t benefit from natural scalp oils. To maintain your colour, use purple or blue shampoo every 2–3 weeks instead of with every wash. This prevents over-processing while keeping unwanted tones under control. Wear gloves during application to avoid staining your hands with the pigmented formula. If you accidentally over-tone your extensions and notice a lilac or blue tint, a clarifying shampoo can help remove the excess pigment and bring back a more natural look. Start with shorter application times and gradually increase as needed for the safest results. Conclusion: Getting Perfect Hair Extension Blending Achieving a flawless blend with hair extensions takes more than just finding a close colour match. Hair tones shift depending on lighting, undertones, and natural highlights, which is why relying on a single method can often result in extensions that look out of place. To get that seamless look, combine several approaches: assess your hair in natural light, use swatches to match the mid-lengths and ends, and opt for multi-tonal or blended extensions. If you're unsure, professional assistance for custom colour matching can make a world of difference. You can also explore virtual tools to analyse your hair tone and use toners or colour-safe treatments to fine-tune the results. This process requires attention to detail and a mix of techniques, but the effort pays off. A carefully matched and blended set of extensions can elevate your look, giving you that polished, salon-quality finish. Silkara Hair offers a Colour Match Guarantee and personalised support, so you can experiment without worry. Whether you're considering halo extensions starting at A$40.00 or clip-in sets from A$36.00, they’ve got you covered. With the right tools and guidance, your extensions can integrate effortlessly into your natural hair. When your extensions blend seamlessly, they not only enhance your style but also boost your confidence. The line between your natural hair and extensions disappears, leaving you with a look that feels as good as it looks. FAQs How can I make sure my hair extensions match my natural hair colour in different types of lighting? To make sure your hair extensions blend smoothly with your natural hair colour in all types of lighting, start by checking the match in natural daylight. This light source gives the truest representation of your hair's shade. Pay close attention to the mid-lengths and ends of your hair, as these are the areas where extensions will merge most seamlessly. It’s also worth testing the colour match in different lighting conditions, like fluorescent or incandescent light, since these can slightly change how colours appear. For extra accuracy, consider using a colour wheel to pinpoint complementary tones. These steps will help you create a cohesive, natural look, no matter the lighting situation. What makes multi-tonal hair extensions better than single-tone ones? Multi-tonal hair extensions mimic the natural variations in hair colour, creating a more lifelike and smooth appearance. Unlike single-tone extensions, which can sometimes come across as flat or unnatural, multi-tonal extensions bring depth and dimension, elevating the overall look of your hairstyle. What makes these extensions stand out is their adaptability. They blend effortlessly with highlights, balayage, or naturally multi-shaded hair, making them a great choice for anyone aiming for a unified and polished result. Whether your hair is straight, wavy, or curly, multi-tonal extensions can seamlessly integrate with your natural locks for a flawless finish. How do virtual colour matching tools help match hair extensions to my natural hair, and how accurate are they? Virtual Colour Matching Tools Virtual colour matching tools use cutting-edge technology to analyse the photos you upload, focusing on details like your hair colour, texture, and the lighting in the image. Based on this analysis, they suggest extension shades that are designed to blend seamlessly with your natural hair. Some even take it a step further with augmented reality features, letting you see how different colours would look on you in real-time. While these tools can be a helpful guide, their accuracy depends on factors like the quality of your photo and the lighting conditions when it was taken. They might struggle to pick up on subtle undertones, which are often crucial for a perfect match. For the most accurate results, consulting a professional stylist is always a good idea. Still, these tools are an excellent way to get started with finding extensions that suit your hair and enhance your overall look. Related posts How to Trim Hair Extensions at Home 5 Quick Hairstyles Using Clip-In Extensions Common Hair Extension Problems and Solutions Hair Extension FAQ: Top Questions Answered
Learn more
Hair Extension FAQ: Top Questions Answered
Want longer, fuller hair instantly? Hair extensions could be your answer. From clip-ins to tape-ins and halos, there’s an option for every lifestyle and hair type. Here’s what you need to know: Clip-ins: Quick and easy (15–30 mins), great for beginners, reusable, and ideal for special occasions. Cost: $30–$400. Tape-ins: Long-lasting (4–8 weeks), lightweight, and seamless but needs professional application and care. Cost: Varies. Halo extensions: Fastest to apply (under 5 mins), no damage, and beginner-friendly. Best for events or daily wear. Cost: $30–$400. Quick Comparison Table Extension Type Application Time Hair Damage Reusability Comfort Level Beginner-Friendly Halo Less than 5 minutes None High Very comfortable Yes Clip-in 15–30 minutes Low High Moderate Yes Tape-in 1–2 hours Moderate Moderate Comfortable Yes Key Tips for Maintenance: Use sulfate-free shampoo. Brush daily with a wide-tooth comb. Store extensions in a cool, dry place. Remove clip-ins before bed and braid permanent extensions overnight. Extensions are perfect for adding volume, length, or even experimenting with new styles. Choose based on your hair type, lifestyle, and maintenance preferences. Ready to transform your look? Let’s dive deeper! How to Choose the Perfect Hair Extensions ❤️ Ultimate Guide to Clip-In Hair Extensions Types of Hair Extensions and Their Benefits Picking the right hair extensions comes down to your lifestyle, styling goals, and how much time you can dedicate to maintenance. Whether you're after a quick, temporary change or a longer-lasting solution, there's an option tailored to your needs. Clip-In Extensions: Convenient and Versatile Clip-in extensions are a fantastic option for beginners. They attach to your natural hair with small clips and can be applied at home in just 15–30 minutes. They're gentle on your hair, affordable, and incredibly versatile for styling purposes. Perfect for special occasions or nights out, clip-ins let you add volume and length when you need it - and take them off before bed. As hairstylist Shawntá Johns puts it: "Clip-ins are awesome for low-commitment extension wearers. You can wear them just for a day or special occasion and then remove them. If you take good care of them, they can last you a long time". They’re also ideal for testing out new hairstyles or colours without making a long-term change. If your hair is shorter than shoulder length, smaller clip-in sets might blend better than full sets. With proper care, high-quality clip-ins can last for months, making them an economical choice. Tape-In Extensions: Lightweight and Seamless If you're looking for a longer-lasting yet flexible option, tape-in extensions are worth considering. Applied by a professional using adhesive tape, the process takes 1–2 hours, and the extensions can last for 4–8 weeks. They blend seamlessly into your natural hair, making them almost undetectable. Tape-ins are especially great for adding volume and length to thin hair. Since they’re lightweight, they don’t create the heaviness that some other extension types might, and you can style them freely. However, they do require extra care. Hairstylist Mel Moss notes: "Adhesive-based methods such as tape-ins are not ideal for anyone who likes to air dry or needs a lot of moisture for their hair/scalp. These factors mean the adhesive will break down faster, resulting in extensions slipping or falling out and needing reinstallation more frequently". This makes them better suited to those who use heat styling and don’t rely on heavy moisture treatments for their hair or scalp. Halo Extensions: Fast and Gentle Halo extensions are one of the quickest and safest options available. They’re applied in under five minutes and sit on your head like an invisible headband - no clips, tape, or adhesive required. This makes them a beginner-friendly choice, especially for anyone worried about damaging their hair. Halos are incredibly comfortable, reusable, and perfect for achieving a glamorous look for events or daily wear. They blend naturally with your hair, making them great for creating long, flowing styles. Extension Type Application Time Hair Damage Reusability Comfort Level Beginner-Friendly Halo Less than 5 minutes None High Very comfortable Yes Clip-in 15–30 minutes Low High Moderate Yes Tape-in 1–2 hours Moderate Moderate Comfortable Yes When choosing halo extensions, matching the colour is key. For the most natural look, match the extensions to the mid-lengths of your hair rather than the roots. In Australia, synthetic halos generally cost between $30 and $100, while human hair versions range from $150 to $400. The main drawback of halos is that they may not work well for very thin hair or highly active lifestyles, as they can shift with vigorous movement. Still, each type of extension offers its own set of benefits, catering to a wide range of hair needs and preferences. How to Install and Maintain Hair Extensions Getting your hair extensions right from the start makes a big difference in how they look and how long they last. Whether you're trying clip-ins for the first time or handling tape-ins, using the correct techniques can keep your hair healthy and your extensions looking seamless. DIY Application Tips for Beginners If you're new to extensions, clip-ins are a great starting point. Begin by sectioning your hair just below your ears and attaching a 3-clip weft under your part. Then, move up to a 4-clip weft at mid-ear level, followed by a longer weft above your ears. Finish with a 3-clip weft about 5 centimetres below your crown and place 2-clip wefts 5 centimetres above each ear. For a secure fit, teasing the roots before clipping in the extensions adds volume and keeps them from sliding out. Tape-in extensions take a bit more precision but can still be done at home with some practice. Start by washing and drying your hair without conditioner. Section off the top portion of your hair and take a thin strand from the lower section - using too much hair can weaken the tape's grip. Place the bottom extension underneath the strand, then attach the top extension to sandwich your natural hair in between. Avoid placing tape-ins too close to your hairline to ensure they remain hidden. Halo extensions are the easiest to apply quickly. Brush your hair thoroughly, section it at the crown, and position the halo over the section. Secure 2-clip wefts at each temple and blend it with your natural hair for a flawless finish. When brushing, be careful around the wire to avoid snagging. Here’s an at-a-glance guide to these methods: Extension Type Application Steps Key Tips Clip-In Section hair → Insert wefts from bottom up → Blend Tease roots; remove before bed Tape-In Wash & dry hair → Section → Attach by sandwiching hair Avoid the hairline; use minimal hair Halo Brush hair → Section at crown → Position & secure clips Be gentle around the wire when brushing Hair stylist Madeline Johnson shares, "I don't suggest [applying tape-in extensions] on greasy hair. They should always be applied on clean hair and [with] no products in it". Washing and Styling Best Practices How often you should wash your extensions depends on the type and how you wear them. Tape-ins, for example, typically need washing 1–2 times a week, while clip-ins can go 12–15 wears before needing a clean. Ponytail extensions can last even longer, up to 15–20 wears, before requiring a wash. Stick to sulfate-free shampoos to avoid stripping the hair of its natural oils. Use lukewarm water to minimise damage, and when conditioning tape-ins, keep the product away from the roots to protect the adhesive. Between washes, dry shampoo can help keep your hair looking fresh. Air drying is the gentlest option, but if you use heat tools, always apply a heat protectant first. Deep conditioning treatments can help maintain moisture and prevent brittleness, but balance is key - overwashing or product build-up can shorten the life of your extensions. Storage and Care Tips Taking care of your extensions after wearing them is just as important as proper installation. Always make sure they are completely dry before storing them to avoid issues like mould or colour fading. Keep them in a cool, dry place away from direct sunlight [11]. Use a wide-toothed comb to gently detangle your extensions, and consider washing them with sulfate-free products before putting them away for an extended period. For storage, options like original packaging, silk bags, or specialised cases work well to keep them protected. For everyday care, hairstylist Madeline Johnson suggests, "I always advise my clients to put their hair into braids so the hair doesn't get tangled. [...] And definitely brush it daily". Removing clip-ins before bed helps prevent tangling and damage, while braiding permanent extensions at night can protect both your natural hair and the extensions. sbb-itb-08feb2f Troubleshooting Common Hair Extension Problems Many hair extension issues can be resolved with simple techniques and the right tools, often without needing professional help. Preventing and Fixing Tangling Even with proper installation and care, tangling can still happen. Extensions are more prone to tangling because they lack the natural oils from your scalp, which help keep hair smooth and hydrated. Common causes include dryness, product buildup, friction, and improper storage [15]. To keep your extensions tangle-free, focus on deep conditioning the mid-lengths and ends. When brushing, use a wide-tooth comb or a boar bristle brush, starting at the ends and working your way up to avoid damaging the attachment points. For storage, use a silk or satin bag or hang your extensions on a proper hanger. Sleeping on a silk pillowcase or loosely braiding your hair can also help minimise friction. If tangling gets severe and turns into matting - where hair knots into tough clumps - act quickly. Lightly dampen the hair, apply a lightweight oil like argan, coconut, or olive oil, and gently detangle with a wide-tooth comb, again starting at the ends. Now, let’s look at how to handle slippage with tape-in or clip-in extensions. Solutions for Tape-In or Clip-In Slippage Slippage can often be traced back to how the extensions were applied or the condition of your hair. For tape-in extensions, slippage is usually caused by an oily scalp or incorrect application. To prevent this, wash your hair thoroughly (avoiding conditioner at the roots) and ensure it’s completely dry before applying the extensions. When installing tape-ins, carefully section your hair and press each piece firmly, keeping them slightly away from the scalp to form a secure bond. After installation, wait 48 hours before washing your hair and stick to washing only once a week. Use paraben-free, alcohol-free products and rely on dry shampoo to manage oil between washes. If slippage occurs, you might need to reapply adhesive with replacement tape or a proper extension glue. Switching to oil-free styling products can also help, and sleeping on a silk pillowcase will protect the bond. For clip-in extensions, slippage might be due to poor-quality clips, slippery hair texture, or incorrect placement. Opt for high-quality clips with silicone bands for a better grip. Avoid installing clip-ins on freshly washed hair; instead, lightly tease your roots or use dry shampoo to add texture. Carefully section your hair before clipping in the extensions, ensuring each weft is secure but not overly tight. A light-hold hairspray at the roots can provide extra security, though try to avoid touching your hair too much throughout the day to keep everything in place. Next, let’s discuss how to address scalp irritation. Managing Scalp Sensitivity If you have a sensitive scalp, wearing extensions might cause discomfort, irritation, or even allergic reactions. Human hair extensions are often a better choice than synthetic ones because they’re more breathable. Look for hypoallergenic options, and before committing to a full set, test a small section on your scalp for 24–48 hours. When applying extensions, ensure they’re not installed too tightly, as excessive tension can lead to headaches or irritation. Even clip-ins, while non-invasive, can cause discomfort if clipped too firmly. Tape-in extensions, on the other hand, might irritate your scalp due to the adhesive. Maintaining good scalp hygiene is crucial. Use gentle, sulfate-free shampoos to prevent buildup and irritation, and keep your scalp moisturised with hydrating leave-in conditioners or soothing oils. A gentle scalp massage can also improve circulation and promote overall scalp health. If you experience ongoing irritation, redness, or pain, consult a dermatologist or a professional stylist for tailored advice. Making Your Extensions Last Longer and Look Better Taking care of your hair extensions isn’t just about keeping them intact - it’s about maintaining their look and feel, too. With the right care and styling, you can protect your extensions and make them a standout part of your everyday look. Extending the Life of Your Extensions How long your extensions last comes down to two things: the type of extensions you have and how well you take care of them. A consistent daily routine is key to getting the most out of your investment. Start with regular brushing to prevent tangles. Always hold the top of the weft while brushing to avoid unnecessary pulling. Begin at the ends and work your way up, which helps minimise tension. Adding a touch of hair oil to the mid-lengths and ends can keep your extensions hydrated and looking smooth. Next, let’s talk about styling. The way you style your extensions can also play a big role in their longevity. Simple Styling Ideas for Daily Wear When it comes to styling, less is more. Avoid overusing heat tools - air drying and embracing natural styles like braids or buns are much gentler on your extensions. If you do reach for heat tools, always use a heat protectant, stick to the lowest temperature setting, and opt for tools like curling tongs to create soft waves with minimal damage. Protective hairstyles are another great option. Low ponytails, loose buns, or relaxed braids can keep your extensions secure while reducing friction. For special moments, styling freshly washed extensions can bring out their natural shine and movement. But styling isn’t the only thing to consider - daily activities can also affect the longevity of your extensions. Protecting Extensions During Activities Your extensions need a little extra care during certain activities. For instance, before bed, make sure your hair is dry. Remove any clip-in extensions, and loosely braid your hair or secure it with a silk scrunchie. Sleeping on a silk pillowcase can also cut down on friction and preserve your style overnight. If you’re hitting the gym, choose extensions that suit your activity level and make sure they’re secured properly. Using headbands or towels can help keep sweat away from the bonds, and washing your hair after exercising removes salt and bacteria that could irritate your scalp. Swimming? Wet your hair with fresh water before diving into a chlorinated pool to limit how much chlorine it absorbs. Loosely braid your hair to prevent tangling underwater, and rinse thoroughly with fresh water afterward to wash away any chemicals. Sarah Mckenna, Founder of Vixen & Blush, sums it up perfectly: "Proper care of your hair extensions is the secret to keeping them looking gorgeous for longer". Conclusion: Building Confidence with Hair Extensions Hair extensions can completely transform your look while giving your confidence a much-needed boost. This guide has covered the various types of extensions available, from the convenience of clip-ins to the natural appeal of tape-ins and the effortless simplicity of halo extensions. These additions don’t just add volume, length, and thickness to your hair - they can also help conceal thinning areas or bald spots, creating a fuller, more vibrant appearance. What makes them especially appealing is their flexibility, offering a non-invasive way to experiment with and customise your style. By understanding your hair type and lifestyle, you can select the option that works best for you and ensures long-lasting results. When choosing extensions, factors like your hair type, daily routine, budget, and level of commitment should guide your decision. Opting for high-quality extensions, especially those made from human hair, is essential for a natural look and durability. Additionally, proper colour matching is crucial for a seamless blend with your own hair. Silkara Hair understands the importance of quality and offers personalised solutions designed to integrate flawlessly with your natural hair. Finding the perfect extensions doesn’t have to be complicated. Think about your lifestyle, how much time you want to spend on maintenance, and your styling habits. The right extensions should feel like an extension of yourself - effortlessly enhancing your beauty with minimal upkeep. FAQs How can I choose the best hair extensions for my hair type and lifestyle? Selecting the best hair extensions depends on your hair type, lifestyle, and how much time you're willing to spend on upkeep. If your hair is fine or thin, lightweight options like clip-ins or tape-ins are a great choice. They’re gentle on your natural strands and help avoid unnecessary stress. For those with thicker hair, sew-ins or fusion extensions can add the volume and durability you might be after. If you lead an active lifestyle, consider secure options like sew-ins or micro-links. These tend to stay in place better during workouts or outdoor adventures. When it comes to maintenance, think about how much effort you want to put in. Clip-ins are quick to use and require very little upkeep, while sew-ins and other semi-permanent extensions will need regular salon visits for adjustments. The key is to balance your hair goals with what fits seamlessly into your daily routine. How can I properly care for and store my hair extensions to make them last longer? To keep your hair extensions in great condition and extend their lifespan, here are some straightforward care tips: Daily Maintenance: Gently brush your extensions every day, starting from the ends and working your way up to prevent tangles. Use a sulphate-free shampoo and conditioner when washing, and make sure to rinse thoroughly to avoid any product residue. Drying Tips: Always ensure your extensions are completely dry before putting them away. Storing damp extensions can lead to matting or even mould, which can ruin their quality. Proper Storage: Keep your extensions in a cool, dry place, away from direct sunlight to maintain their colour and texture. A storage bag or box specifically designed for extensions is ideal for keeping them tidy, untangled, and safe. By following these care practices, your extensions will remain soft, shiny, and gorgeous for a longer time. Can hair extensions damage my natural hair, and how can I avoid this? Hair extensions can sometimes harm your natural hair, especially if they’re not applied or maintained properly. One common issue is traction alopecia, which happens when extensions are too tight and put excessive strain on the scalp, potentially causing hair loss over time. To reduce the chances of damage, opt for gentler methods like tape-ins or micro-links, which tend to be kinder to your natural hair. Taking care of your extensions is equally important - use brushes designed for extensions to avoid tangling, steer clear of heavy styling products, and clean them regularly, but don’t overdo it. For the best outcome, it’s always a good idea to consult a professional stylist. They can guide you on how to apply and care for your extensions, helping you maintain healthy natural hair while enjoying the extra length and volume. Related posts 7 Best Hair Extension Types for Fine Hair: A Complete Guide How to Wash Clip-In Hair Extensions: Step-by-Step Care Guide 5 Quick Hairstyles Using Clip-In Extensions Halo vs Clip-In Extensions: Pros and Cons Guide
Learn more
Halo vs Clip-In Extensions: Pros and Cons Guide
If you’re deciding between halo and clip-in hair extensions, here’s a quick breakdown: Halo Extensions: Easy to apply (under 5 minutes), lightweight, no damage to natural hair, lasts up to 12 months, better for thin to medium hair. Costs range from $150–$600. Clip-In Extensions: More styling options, secure fit, low damage risk, lasts 9–12 months, better for thick or short hair. Costs range from $150–$500. Quick Comparison Feature Halo Extensions Clip-In Extensions Application Time Under 5 minutes 15–30 minutes Attachment Method Single wire piece Multiple clip-in wefts Damage Risk None Low Styling Options Best for natural looks Great for updos, braids Comfort Lightweight, gentle Can feel less comfortable Price $150–$600 $150–$500 Key takeaway: Choose halo extensions for simplicity and comfort, or clip-ins for versatility and styling options. Select based on your hair type, lifestyle, and budget. Direct Comparison: Features and Benefits Installation Time and Steps Halo extensions are straightforward to apply. They consist of a single weft attached to a thin wire, which sits like a headband. To install, clip up your hair, position the halo, and let your hair fall naturally over it. Many users can achieve a complete transformation in just a minute. On the other hand, clip-in extensions require sectioning your hair and attaching multiple clips. While this process may sound more involved, experienced users can apply clip-ins in under two minutes. Once installed, the real test lies in how these extensions perform throughout daily wear. Daily Comfort and Wear Halo extensions are celebrated for their lightweight feel and even weight distribution, which helps minimise pressure points. This makes them an excellent choice for individuals with sensitive scalps. Additionally, since they don’t attach directly to your natural hair, they significantly lower the risk of tension or damage. Clip-in extensions offer a different kind of benefit. They provide a secure grip, making them ideal for styling versatility, such as updos or intricate braids. However, to avoid discomfort or root tension, occasional adjustments may be necessary. Both options cater to active lifestyles, but their strengths vary depending on the activity: Activity Type Halo Extensions Clip-In Extensions Everyday Comfort Lightweight with even weight distribution Secure fit when clips are positioned well Styling Versatility Perfect for loose, natural-looking hairstyles Great for updos and detailed styles Active Outings Stays in place during most physical activities May need minor adjustments for a secure fit Price Breakdown Cost is another critical factor to consider when choosing between these two options. Prices depend on factors like length, volume, and hair type: Cost Factor Halo Extensions Clip-In Extensions Initial Purchase $150–$600 $150–$500 Salon Cut-In ~$50 $50–$100 Annual Maintenance Minimal $100–$500 20-inch Standard Set $349 $479 20-inch halo extensions: $349 7-piece clip-in sets (20-inch): $479 16-inch halo extensions: $289 While the initial costs for both types of extensions are comparable, halo extensions tend to offer better long-term value. This is largely due to their minimal maintenance requirements and reduced likelihood of causing hair damage. Hairstyling Options and Uses When it comes to versatility and convenience, hair extensions open up a world of styling possibilities. Here's how halo and clip-in extensions can transform your daily look or help you shine at special events. Daily Hairstyle Options Both halo and clip-in extensions offer plenty of options for everyday styling. Halo extensions are perfect for creating natural, flowing looks with added volume and length. They work particularly well for loose waves or sleek, straight styles. However, keep in mind that during humid summer days, halo extensions might behave differently compared to your natural hair. Clip-in extensions, on the other hand, provide more flexibility. With sets typically including 7–9 wefts, you can experiment with a variety of styles such as: Loose and straight looks Braided hairstyles Ponytails Elegant updos Half-up, half-down styles Different occasions might call for specific approaches, and both extension types can be adapted to suit the moment. Events and Activities The choice between halo and clip-in extensions often depends on the event, activity, or even the weather. Here's a quick comparison to help you decide: Scenario Halo Extensions Clip-In Extensions Beach Days Less ideal due to wind exposure Better choice with secure styling Formal Events Great for flowing, elegant styles Perfect for intricate updos Outdoor Activities May need extra securing Stays secure with proper installation Humid Weather Can show texture differences Easier to manage with the right products Styling Tools and Hair Types Both halo and clip-in extensions, provided they are made from 100% human hair, can be styled safely with heat tools. To keep them in top condition: Always use a heat protectant spray. Keep styling tools below 176°C to avoid damage. Whenever possible, opt for air-drying to minimise heat exposure. For clip-in extensions, those with fine or thin hair should consider using smaller clips to keep them discreet. Teasing the hair above the clip attachment points can also help conceal them effectively. With these tips, you can make the most of your extensions, whether you're going for a casual daytime look or a polished evening style. sbb-itb-08feb2f Care and Lifespan Taking proper care of your extensions is essential, especially given Australia's diverse climate. Here’s how to maintain halo and clip-in extensions to keep them looking their best. Washing and Care Steps Halo extensions don’t need frequent washing - every three months or when they’re visibly dirty is enough. Beauty expert Taryn Melissa advises: "A ballpark suggestion is wash your halo every 3 months. If your halo doesn't look or feel like it needs to be washed, don't wash it for the sake of it." Here’s a quick guide to caring for your extensions: Care Aspect Halo Extensions Clip-In Extensions Washing Frequency Every 3 months or when dirty When greasy or showing product buildup Recommended Products Gentle shampoo and conditioner (no serums/oils) Sulfate-free shampoo and conditioner Product Usage Avoid serums and oils Use a small amount of leave-in conditioner Brushing Use a wide-tooth comb on dry extensions Start gently from the tips In addition to washing, proper storage plays a huge role in maintaining your extensions. Storage Tips and Life Expectancy How you store your extensions can significantly impact their longevity. With the right care, halo extensions can last between 6 to 24 months, while clip-in extensions often last up to 12 months. Follow these storage tips to extend their lifespan: Store extensions in a cool, dark place, preferably in their original packaging or a silk-lined pouch, away from direct sunlight. Always remove extensions before going to bed. Detangle and clean them thoroughly before storing. Perfect Locks highlights the importance of hydration for your extensions: "Just as you hydrate and moisturize your skin, your hair also needs some TLC to keep it hydrated and looking full of life. You want to make sure you have a quality shampoo and conditioner, as well as a leave-in conditioner for your extensions." Conclusion: Making Your Choice Key Points to Consider Choosing between halo and clip-in extensions comes down to your personal lifestyle, hair type, and styling needs. Here's a quick comparison to help you decide: Factor Halo Extensions Clip-In Extensions Hair Type Best for thin to medium hair; works well with longer hair Great for short, thick, or blunt-cut hair Application Quick, simple, and beginner-friendly Requires practice for proper application Comfort Lightweight and gentle on the scalp Can feel less comfortable, especially on sensitive scalps Styling Perfect for long, flowing styles Offers a range of versatile styling options Maintenance Low maintenance with minimal care needed Requires consistent upkeep and careful storage These points can help you weigh the pros and cons based on what works best for you. Next Steps Here’s how to narrow down your choice: Think about your hair type: If your hair is thin or medium and past shoulder length, halo extensions are a great match. For thicker or shorter hair, clip-ins might be the better option. Consider your styling preferences: Go for halo extensions if you prefer a natural, flowing look with minimal effort. If you want more volume and styling flexibility, clip-ins are the way to go. Set your budget: Clip-ins start at around $36.00, but halo extensions often offer better long-term value thanks to their durability and lower maintenance needs. Take these steps to find the perfect fit for your hair needs and lifestyle! FAQs How can I decide between halo and clip-in hair extensions for my hair type and lifestyle? Choosing between halo extensions and clip-in hair extensions comes down to your hair type, styling habits, and how much time you want to spend on your routine. If you have fine or delicate hair, halo extensions might be your best bet. They sit gently on top of your head without attaching to your hair, which means less chance of damage. Plus, they’re super quick to put on and take off - perfect if you’re all about ease and comfort. Clip-in extensions, however, offer more styling options. With different weft sizes available, you can customise your look to suit your mood or occasion. These are a great choice if you have thicker hair or love playing around with different hairstyles. When deciding, think about your hair’s thickness, how often you’ll wear the extensions, and whether you value convenience or the freedom to switch up your style. How should I care for halo and clip-in extensions to make them last longer? To keep your halo extensions in great condition, aim to wash them every 1–2 months or whenever they start to feel oily. Use cold water paired with a gentle, sulphate-free shampoo, and don’t forget to follow up with conditioner. Limit heat styling as much as possible, but if you need to, ensure the temperature stays below 180°C. Let them air dry naturally, and apply hydrating products to preserve their softness and shine. For clip-in extensions, wash them after approximately 12–15 wears or whenever they appear dirty. Use lukewarm water with a sulphate-free shampoo and allow them to air dry completely. Before washing, gently detangle them to prevent knots. Proper storage is key to avoiding tangles, and if you’re styling them, always use a heat protectant to maintain their quality. By giving both types of extensions the right care and keeping washing to a minimum, you can ensure they stay soft, shiny, and last longer. Can I use heat tools on halo and clip-in extensions, and how can I protect them? Yes, you can style both halo and clip-in extensions with heat tools, but it's crucial to take the right steps to protect them. Start by using a heat protectant spray to reduce the risk of damage. Stick to low to medium heat settings to avoid overheating, and make sure the extensions are completely dry before you begin styling. To help them last longer, try not to rely on heat styling too often. Instead, experiment with gentler methods like braiding or using rollers to create curls. With proper care, your extensions will maintain their lush, healthy appearance for much longer. Related posts 7 Best Hair Extension Types for Fine Hair: A Complete Guide 5 Quick Hairstyles Using Clip-In Extensions Synthetic vs Human Hair Extensions: Which Should You Choose? Common Hair Extension Problems and Solutions
Learn more
10 Best Hair Extension Tools for Home Use
Want salon-quality hair extensions at home? The secret isn’t just in the extensions - it’s in the tools. From heatless curlers to precision pliers, using the right tools can help you style, maintain, and extend the life of your extensions while protecting your natural hair. Here’s a quick overview of the must-have tools for Australians looking to achieve flawless results at home: Silkara Hair Heatless Curlers: Create stunning curls overnight without heat damage (AUD 24.95). Loop Brush for Extensions: Detangle extensions without snagging or frizz (AUD 20–30). Nano and Micro Extension Pliers: Handle tiny rings with precision (AUD 28–37). Extension Machine Tool Set: All-in-one kit for professional-level application (AUD 85–150). Hair Sectioning Clips: Keep sections neat for even placement (AUD 6–10). Laifen Swift Hair Dryer: Ionic technology for frizz-free, shiny extensions (AUD 139.99). Extension Cutting Shears: Japanese/German steel for clean, precise cuts. Bead Opening Tools: Safely remove beads without damage (AUD 40). Hair Weaving Needles: Essential for secure installations (AUD 5–7). Quick Comparison Table Tool Key Feature Price (AUD) Best For Silkara Curlers Heatless overnight curls 24.95 All extension types Loop Brush Nylon loops, anti-frizz 20–30 Detangling extensions Nano/Micro Pliers Precision ring handling 28–37 Nano/micro ring applications Extension Machine Set Complete application kit 85–150 DIY professional application Sectioning Clips Durable, rust-resistant 6–10 Neat sectioning for placement Laifen Hair Dryer Ionic tech, smart heat control 139.99 Frizz-free drying Cutting Shears Japanese/German steel blades 50–100 Precise extension cuts Bead Opening Tools Fine tips, ergonomic grip 40 Safe bead removal Weaving Needles Stainless steel, curved design 5–7 Securing wefts/extensions Styling Iron Adjustable heat, ceramic/titanium 55–200 Smooth, frizz-free styling Pro Tip: Start with basic tools and upgrade as you gain confidence. Quality tools not only protect your extensions but save you time and money in the long run. Ready to style like a pro? Let’s dive into the details! What's Inside My Hair Extension Tool Kit: Must-Have Tools for Perfect Extensions 1. Silkara Hair Heatless Curlers Silkara Hair Heatless Curlers are the perfect solution for achieving stunning curls without exposing your hair to damaging heat. Crafted from silk, these curlers help reduce friction and minimise breakage, ensuring your hair extensions remain smooth, tangle-free, and in top condition. Here's a closer look at their standout features and how to use them effectively. These curlers are incredibly versatile, allowing you to create everything from soft, loose waves to defined, bouncy curls. Plus, with a temperature-safe range of 71–85°C, they help protect your hair from heat damage - an especially important feature in Australia's warm climate. How to Use Silkara Hair Heatless Curlers Start with damp, nearly dry hair and apply a light styling product for hold. Place the curler horizontally across the top of your head. Wrap sections of your extensions around the curler. Secure the hair in place using the provided silk scrunchies. Leave the curlers in overnight to let your curls set naturally. These curlers are compatible with all types of extensions, such as tape-ins, nano rings, and weaves, making them a versatile choice for anyone looking to style their hair effortlessly at home. With a price tag of AUD 24.95 and glowing reviews from over 9,500 users, they bring salon-quality results right to your doorstep. Feature Benefit Silk Material Reduces friction and prevents tangling Overnight Styling Allows you to style your hair as you sleep Universal Design Works with all types of extensions Temperature Safe Protects hair by maintaining a safe temperature If you're after gorgeous curls without the heat damage, Silkara Hair Heatless Curlers are a game-changer! 2. Loop Brush for Extensions A loop brush with 123 nylon loops and hollow, ionic powder-tipped bristles is a must-have for keeping extensions tangle-free. It’s especially handy for those humid Australian days when static and frizz can be a challenge. The nylon-looped bristles glide smoothly, protecting the bonds of your extensions while detangling with ease. Design Features This brush is designed with hollow, drop-shaped bristles coated in ionic powder. These features help reduce static and frizz, making it effective for various extension types, including tape-ins and microlinks. The flexible bristles gently work through your extensions, from roots to ends, ensuring they stay intact and looking their best. Feature Benefit Nylon Loops Prevent snagging on extension bonds and natural hair Ionic Powder Coating Minimises static and frizz Hollow Drop Shape Reduces tangling and protects extension connections Flexible Design Works on both wet and dry hair Once you’ve got the brush, using it the right way will make all the difference. Proper Brushing Technique To get the most out of your loop brush, stick to these steps: Hold Extensions Securely: Use one hand to hold the base of your extensions steady while brushing. Start at the Ends: Begin brushing at the tips and work upwards in small sections. Brush Twice a Day: For semi-permanent extensions, brushing in the morning and before bed helps prevent tangles. One satisfied user shared: "One hundred and twenty three nylon loops enable this brush to easily glide through your hair and remove tangles without the worry of snagging on your bonds, bases or natural hair strands." - RemySoft Maintenance Tips Keeping your brush in good shape is just as important as using it correctly. Regularly clean it to remove hair and product build-up. Avoid brushes with ball-tipped bristles, as they can catch on adhesives and microlinks. Gentle, consistent brushing not only prolongs the life of your semi-permanent extensions but also keeps them looking as good as they did when you left the salon. Plus, the brush's cellulose acetate material is an eco-friendly choice, offering anti-static benefits while being kind to the planet. 3. Nano and Micro Extension Pliers Nano and micro pliers are essential tools for managing rings and bonds with precision. Crafted from surgical-grade stainless steel, these tools are designed to handle even the tiniest nano rings with ease and accuracy. Professional-Grade Features The standout features of nano and micro pliers make them indispensable for extension work. Here's what sets them apart: Feature Benefit Surgical Steel Construction Offers long-lasting durability and resists rusting Dual Spring Handles Enhances control and ensures a secure grip Ergonomic Design Minimises hand fatigue during extended use Precision Ring Notches Perfectly reshapes and restores rings Multi-Use Capability Suitable for both nano and micro rings These features, combined with proper technique, ensure precision and efficiency in every use. Proper Usage Tips When using nano and micro pliers, maintain a steady but gentle grip to avoid damaging the rings. Their fine-tipped ends are designed for precise handling, making it easier to work with even the smallest nano rings. As Hair Made Easi points out, a firm yet delicate touch is key to achieving the best results. Maintenance Requirements To keep your pliers in top condition and extend their lifespan, follow these simple maintenance steps: Clean them thoroughly after each use to remove any product build-up. Store them in a protective pouch to prevent damage. Apply anti-rust oil occasionally to maintain their stainless steel finish. Regularly check the alignment of the tips to ensure consistent performance. Price Range and Value The price of quality pliers varies depending on the brand and features. For instance, the Cross Edge Corporation Hair Extension Micro Beads & Tape in Remover Plier is available for AUD 28.00, while the premium Beauty Works Nano Pliers are priced at AUD 37.00. Professional Results at Home Achieving salon-quality results at home is possible with the right tools. Look for pliers with precision tips, ergonomic handles, and durable stainless steel construction. Models that can handle multiple ring sizes offer added versatility. Pairing quality tools with proper technique ensures professional-level results, while regular maintenance keeps your pliers performing at their best. 4. Extension Machine Tool Set A complete extension machine tool set provides everything needed for professional-quality results at home. Below, we break down the key components and what makes them indispensable. Components and Features Component Purpose Key Features Extension Machine Application Fast-curing lamp technology Pulling Hook Hair Sectioning Precise placement control Professional Pliers Bead Closure Silicone-padded jaws Sectioning Tools Hair Management Ergonomic design Adhesives Secure Attachment Hypoallergenic formulas Professional-Grade Options For those looking to elevate their home application experience, premium sets are available. The Extension Master Kit is a standout option, equipped to handle multiple extension types. It includes specialised tools like the Pro Fusion Tool and Pro Tape-In Press, ensuring consistent, high-quality results across various methods. Time-Saving Technology Modern systems are designed for efficiency, with some kits allowing you to install a full head of extensions in as little as 30 minutes. Application Materials These kits come packed with all the essentials: hypoallergenic adhesives, micro silicone link ring beads, professional-grade removal solutions, and protective heat shields to ensure a safe and smooth application process. Investment Value Pricing for a complete set typically falls between AUD 85 and AUD 150, making it a cost-effective choice for home users. A popular pick is the SCIAZA 6D Hair Extension Machine Kit, priced at AUD 85.86, which offers a great balance of quality and affordability. Maintenance Requirements To keep your tool set in top condition: Clean all tools thoroughly after each use. Store them in the protective case provided. Replace adhesives and beads as needed. Regularly check tool alignment to ensure optimal performance. 5. Hair Sectioning Clips Hair sectioning clips are essential for dividing hair into manageable sections, ensuring even and precise extension placement. Types of Sectioning Clips Different types of sectioning clips cater to specific hair needs. Here's a quick guide: Clip Type Ideal For Alligator Clips Thick, coarse hair Plastic Duckbill Dry styling and delicate hair Metal Duckbill Wet styling Butterfly Clips Very thick hair Built to Last High-quality sectioning clips are designed to endure demanding use. For instance, some alligator clips can handle temperatures as high as 160°C and are tested to withstand up to 75kg of pressure. The stainless steel springs in these clips have undergone over 100,000 pressure test cycles, ensuring durability. Tips for Effective Use Sectioning Technique Use a tail comb to create clean, horizontal partings. Secure the upper sections firmly to keep them out of the way. Distribute sections evenly for a balanced and natural result. Choosing the Right Material Opt for plastic clips when working with chemical treatments or heat styling. Use rust-resistant metal clips for wet styling tasks. "Using the proper hair products to achieve the style of your dreams is only half the battle. The tools used behind the chair, or in front of your mirror at home, are equally important." – Ashley Mishler Cost and Value Investing in durable sectioning clips can save money in the long run. For example, AIMIKE offers a 4-piece set for about AUD 5.99, while larger sets, such as a 30-piece option, are available for approximately AUD 9.99. Keeping Your Clips in Top Shape To maximise the lifespan and performance of your sectioning clips: Clean them after each use to remove product buildup. Store them in a dry place to prevent rust. Replace clips that show signs of wear or reduced grip. Regularly check the tension of the springs. 6. Laifen Swift Hair Dryer The Laifen Swift Hair Dryer is designed with advanced features to care for and style your hair extensions at home. It pairs perfectly with other essential tools for maintaining extensions, ensuring both protection and style. Advanced Technology for Extension Care This dryer is powered by a 110,000 RPM brushless motor, delivering an impressive 22m/s airflow. Its ionic technology releases a staggering 200 million negative ions to minimise frizz, boost shine, and maintain the integrity of your extensions. The smart temperature control system monitors heat 100 times per second, ensuring the temperature stays below a safe maximum of 80°C. These features make it a standout choice for extension care. Features Designed for Extensions Feature How It Benefits Extensions Temperature Cycling Alternates between hot and cold air to prevent heat damage Smart Heat Control Keeps the temperature safely below 80°C Multiple Attachments Customises styling for various extension types Lightweight Design Comfortable for extended styling sessions Tips for Using the Laifen Swift with Extensions To get the best results while protecting your extensions, follow these tips: Keep the dryer at least 15 centimetres away from your extensions. Use medium heat settings to avoid excessive heat exposure. Apply a leave-in conditioner before drying for added protection. Select the correct attachment based on your extension type. Choosing the right model for your needs can also enhance your styling experience. Model Options Laifen SE Lite: A budget-friendly option priced under AUD 100. Laifen Swift: A mid-range model available for AUD 139.99. Laifen Swift Special: A premium model priced at AUD 239.99. Maintenance and Durability With just 10 minutes of daily use and proper care, the Laifen Swift can protect both your extensions and natural hair for up to 16 years. Operating at a quiet 59dB, it’s ideal for styling at any time of day. To keep your dryer in top condition: Clean the filter regularly to maintain airflow. Store it in a dry, safe place. Use the appropriate attachments for your styling needs. Maintain a 15-centimetre distance from your hair during use. sbb-itb-08feb2f 7. Extension Cutting Shears Using professional-grade cutting shears ensures precise cuts and helps maintain the integrity of hair extensions. Choosing the Right Shears Investing in high-quality shears made from premium steel is key to achieving clean, smooth cuts. Experts often recommend Japanese or German steel for its durability and sharp edges, which lead to better results. For a more budget-friendly option, American stainless steel is a reliable alternative that still delivers excellent performance. Feature Professional Recommendation Benefit Blade Length 4–5 inches (10–12.5 cm) – great for beginners Offers better control and precision Blade Type Convex edge Prevents fraying and splitting Handle Design Offset finger rest Minimises hand fatigue Material Japanese/German steel Ensures long-lasting sharpness Essential Cutting Techniques The right techniques are just as important as the tools when it comes to cutting extensions. Here are three key methods to master: Point Cutting This involves cutting upwards at a steady angle to blend the ends seamlessly and soften any harsh lines. The result? A more natural, feathered finish. Slicing Technique To create face-framing layers or achieve a smooth blend, hold the extensions at an angle and cut from top to bottom while gently opening and closing the shears. Bulk Removal When you need to reduce weight without affecting the length, try the slithering technique. Glide the open shears from the midshaft to the ends with consistent pressure for a lighter, softer look. Professional Insights Celebrity hairstylist Clayton Hawkins shares this tip: "You don't have to break the bank to find a quality pair of hair cutting scissors." Extension expert Noelle Spinosa adds: "Hair extensions should not be cut with conventional cutting shears unless using them to cut in the very bottom (weight-line) of the extensions or using a 'glide' technique." Maintenance Tips Proper care can keep your shears in top condition for up to 15 years. Here’s how to keep them performing like new: Wipe the blades clean after every use Store them in a protective case to avoid damage Regularly check and adjust the tension Get them professionally sharpened when needed 8. Bead Opening Tools Bead opening tools are specifically designed to safely open the beads used to secure hair extensions. They allow for easy removal without causing damage to either the extensions or your natural hair. Key Features to Look For When choosing a bead opening tool, keep these essential features in mind: Feature Preferred Material Why It Matters Material Aluminium or stainless steel Durable enough for repeated use Tip Design Fine, precision tips Offers better control near the scalp Grip Style Ergonomic handle Minimises hand fatigue during long use Surface Smooth closing surface Prevents beads from being scratched or damaged Special Features Cross-hatch base Helps with removing beads that are mangled These features ensure you can achieve salon-level results at home while protecting your hair and extensions. Types and Uses Bead openers generally come in two main types: Standard Bead Openers: Great for routine maintenance and for opening beads that are properly placed. Crush Bead Openers: Specifically designed for handling beads that have been crushed or compressed, which can be tricky for standard tools to manage. Each type serves its purpose, so it's worth selecting the right one based on your needs. Tips for Professional Results To use bead opening tools effectively, follow these tips: Carefully position the tool around the bead. Apply steady and even pressure when squeezing. Avoid pulling or tugging to prevent unnecessary strain on the hair. Work methodically across the scalp, focusing on one bead at a time. Take your time to ensure clean and safe removal. Worth the Investment High-quality bead opening tools are a worthwhile investment for their durability and consistent performance. For example, the IBE® Bead Remover, priced at AU$40.00, is a popular choice among professionals for its reliability and ease of use. Safety First Always handle bead opening tools gently to protect your natural hair. With practice, you’ll achieve flawless results that rival a professional salon experience. 9. Hair Weaving Needles Hair weaving needles play a key role in securing extensions effectively. Just like other tools from Silkara Hair, using the right technique and precise tools can make at-home extension styling look professional. Types of Needles Different needle designs cater to specific tasks: Needle Type Best For Key Features C-Curved Weave installations, wig creation Curved shape for better control J-Shaped General weaving Straight needle with a hooked end I-Shaped Detail work Straight with a blunt tip L-Shaped Versatile use Combines the benefits of curved and straight needles Latch Hook Micro beads, crochet weaving Includes a closing latch mechanism Key Features to Look For When choosing hair weaving needles, consider these important features: Material: Stainless steel ensures durability and prevents rust. Length: Standard sizes (2–2.5 inches) offer better control. Threading: A large eye size accommodates thicker threads. Tip Design: A slightly dull tip helps avoid scalp injuries. Professional Tips for Home Use To achieve great results with weaving needles at home, follow these tips: Hold C-curved needles with the curve facing upwards. Cut thread to 3–5 times the section length for flexibility. Use a double knot to secure stitches. Start with a triple knot when attaching the thread to the weft for extra stability. Safety Precautions Using sharp tools requires care. Keep these safety practices in mind: Store needles in a pincushion or magnetic holder to avoid accidents. Work in a well-lit area to see clearly. Take regular breaks to prevent hand fatigue. Recommended Needle Sets For beginners, the Lusecarl Needle and Thread for Hair Extensions set is a budget-friendly option at just AU$6.99. It includes 10 needles and 3 rolls of thread, earning a 4.7/5 star rating from 401 customers. If you're looking for a professional-grade choice, the Ari C-Curved Sewing Needle set offers 12 needles for AU$4.99. However, some users have mentioned these needles might feel too sharp for those new to weaving. 10. Extension Styling Iron A high-quality styling iron is a must-have for achieving salon-worthy results while keeping your hair extensions in top condition at home. Plate Materials and Their Benefits The type of material used for the plates can significantly impact your styling experience. Here's a quick breakdown of the most common options: Plate Material Ideal For Benefits Ceramic Fine, straight extensions Provides even heat and gentle styling Tourmaline Wavy or curly extensions Boosts shine and reduces frizz Titanium Thick, coarse extensions Heats up quickly and offers excellent durability Choosing the right material ensures your extensions get the care they need while achieving your desired look. Temperature Settings Proper temperature control is essential for maintaining the longevity of your extensions. Look for a styling iron with adjustable heat settings. Use lower temperatures for fine or straight extensions and slightly higher settings for thicker or wavy textures. Always start with a lower heat level and gradually increase as needed - this cautious approach helps prevent damage. Features to Look For Modern styling irons often come with advanced features that make the process easier and safer: Ionic Technology: Reduces static and frizz for a smoother finish. Steam Function: Adds moisture while styling, which is especially helpful for extensions. Even Heat Distribution: Prevents hot spots that can damage hair. Quick Heat-up: Ready for use in just 15–20 seconds, saving time. When shopping, weigh these features against your budget to find a styling iron that meets your needs. Price Ranges and Recommendations Styling irons are available across various price points: Budget options: Starting at around AU$55, these are great for basic needs. Mid-range options: Priced between AU$100 and AU$200, offering a balance of quality and features. Premium models: Exceeding AU$200, these often include advanced technologies and superior materials. For instance, the Beachwaver Co. Coast Pro Titanium Styling Iron, priced at AU$189, features titanium plates and adjustable temperature controls, making it a solid mid-range choice. Protecting Your Extensions Heat protection is non-negotiable when styling extensions. Always apply a heat protectant evenly across sections before using a styling iron. This creates a barrier between the heat and your extensions, which lack the natural oils that protect real hair. Stick to low temperatures and limit heat styling sessions to preserve their quality and lifespan. Tool Features and Prices Choosing the right tools for at-home hair extension care doesn’t have to be overwhelming. The right equipment can make your maintenance routine efficient and cost-effective. Let’s break down the key features and prices of some top tools to help you decide. Basic Tools and Accessories Every extension maintenance kit should include these essentials: Tool Price (AU$) Key Features Cotton Thread AU$9.95 Provides a secure hold with safe, durable material. Mini Scissors AU$14.95 Designed for precision cutting, featuring gold-plated blades. Basic Tools* Various Includes loop brushes, sectioning clips, and more (details covered earlier). *These tools are foundational for everyday extension care. Professional Application Tools For those looking to take their extension game to the next level, these tools are ideal for advanced techniques: Tool Price (AU$) Key Features Bead Clamping Pliers AU$39.95 Ergonomic design for easy micro-ring application. Nano Ring Looping Tool AU$17.00 Lightweight aluminium construction for durability. Pre-Loaded Micro Beads AU$44.00 Silicone-lined for a secure and gentle hold. Extension Machine Tool Set AU$99.95 A comprehensive kit for seamless application. Maintenance and Styling Essentials Maintaining your extensions is just as important as applying them. For this, consider these must-haves: Deluxe Hair Extension Tool Kit (AU$99.95): Combines essential tools for professional-level care and styling. X-TEN Dissolve Tape Hair Extension Remover Spray (AU$14.95): A reliable solution for safely removing tape extensions. Investment Considerations Whether you’re a beginner or a pro, there’s an option to suit your needs and budget. Here’s a quick look at what you can expect: Starter Kit (AU$50-100): Perfect for beginners, this tier includes basic maintenance tools, styling essentials, and core application items. Professional Kit (AU$94.00): A step up with premium tools like high-quality pliers and advanced application equipment, all neatly stored in a durable case. Specialty Tools: For specific needs, consider options like the Hair Extension Trolley (AU$179.95), Professional Colour Ring (AU$99.95), or Silicone-Lined Micro Beads (1000 pieces for AU$35.95). Investing in quality tools not only ensures better results but also protects the health of your hair. Whether you’re maintaining extensions at home or working with clients, professional-grade equipment is worth every dollar. Summary Using professional-grade hair extension tools can help you achieve salon-quality results right at home. These tools not only extend the life of your extensions but also protect your natural hair during application, maintenance, and removal. Plus, they’re built to last, reducing the need for frequent replacements. "Having a rhythm and system(s) in place help to keep 5 star service and quality, and a speed that is cost-efficient and clients appreciate." - Kayla Laumann When choosing tools, keep these key factors in mind: Quality and Durability: Tools made with professional-grade materials ensure consistent performance over time. Functionality: Each tool is designed with a specific task in mind to simplify your extension care routine. Safety Features: Thoughtful designs help prevent damage to both your extensions and natural hair. Starting with a basic kit is a great way to cover the essentials. As you gain confidence and skill, upgrading to more advanced tools can offer greater precision and control. By combining the right tools with proper techniques, you can maintain your extensions like a pro and protect your investment in high-quality hair extensions. FAQs How can I choose the best tools for my type of hair extensions? Choosing the right tools for your hair extensions is all about matching them to the type of extensions you have. For clip-in extensions, a good-quality extension brush and durable clips are all you need for styling and maintenance. These tools help keep your extensions tangle-free and secure while styling. If you’re using tape-in extensions, you’ll need specialised items like tape removers and extension pliers. These are crucial for safely applying and removing the extensions without causing harm to your natural hair. For fusion extensions, a fusion iron and keratin glue are must-haves. These tools help create a strong, long-lasting bond for your extensions. Always tailor your tools to the specific type of extensions you’re using to ensure they stay in great condition and give you that polished, salon-worthy look. How can I make my hair extensions last longer using the right tools? To keep your hair extensions looking their best for longer, using the right tools and following a few simple tips can make all the difference. Start by brushing gently with a soft-bristle brush or a wide-tooth comb. This helps prevent tangles and reduces strain on the extensions. Brush twice a day - once in the morning and again before bed - and always work from the ends upward to avoid pulling or damaging the bonds. When it comes to washing, aim for 2–3 times a week with a gentle, sulphate-free shampoo. After washing, ensure your extensions are completely dry within 30 minutes to avoid moisture-related damage. For styling, don’t skip the heat protectant spray before using hot tools. This simple step helps reduce heat damage and keeps your extensions looking sleek and vibrant. Proper storage is just as important. When you’re not wearing your extensions, store them carefully to preserve their shape and quality. A little extra effort in caring for your extensions ensures they’ll stay looking salon-fresh and fabulous for longer! Can I use the same tools for applying and removing hair extensions, and what techniques should I follow to avoid damage? Yes, many hair extension tools serve a dual purpose, making them handy for both applying and removing extensions, depending on how they’re designed. Take extension pliers, for instance - they’re not only used to secure extensions during application but can also help release them when it’s time for removal. Similarly, tools like tape-in removers or loop tools are crafted to simplify the removal process while keeping your hair safe. When it comes to protecting your natural hair, technique matters. Always work in small, manageable sections, use products specifically designed to gently break down adhesives, and take your time. Rushing the process can lead to unnecessary damage, so a patient and careful approach is essential for keeping your hair healthy during both application and removal. Related posts How to Trim Hair Extensions at Home Heatless Waves vs. Heat Curls: Pros and Cons Common Hair Extension Problems and Solutions Hair Extension FAQ: Top Questions Answered
Learn more
Common Hair Extension Problems and Solutions
65% of women damage their hair extensions within the first three months. Whether it’s tangling, shedding, colour mismatch, or weather damage, proper care is essential to avoid these common issues. Here’s a quick rundown of solutions: Tangling: Regular hydration with oil-based shampoos and protective styles. Shedding: Use loop brushes, avoid rough handling, and opt for professional installations. Colour Mismatch: Match extensions to mid-lengths and ends, not roots. Weather Damage: Protect with UV sprays, lightweight conditioners, and avoid chlorine exposure. Australia’s climate can make extension care challenging, but with the right products and routines, you can keep them looking great. For example, using lightweight extensions during summer or applying heat protectants before styling can help. Quick Tips: Brush gently twice a day. Use sulphate-free products. Sleep on a silk pillowcase. Rinse extensions after swimming. Start caring for your extensions today to extend their lifespan and maintain their natural look. Fixing Tangled and Matted Extensions Why Extensions Tangle Extensions are prone to tangling because they don't benefit from the natural oils your scalp produces, which help keep hair smooth. Here are some common causes and how you can address them: Cause Prevention Lack of moisture Deep condition regularly Product buildup Opt for lightweight, oil-based products Daily friction Try protective styles Incorrect storage Use proper storage techniques How to Prevent Tangles Taking care of your extensions is all about keeping them hydrated and free from damage. Start with regular moisturising treatments using oil-based shampoos and deep conditioners to maintain hydration levels. For added protection, apply a lightweight water-based serum or a few drops of argan oil to the mid-shaft and ends of the hair. If you're using heat styling tools, keep the temperature at or below 120°C to avoid weakening the hair. When it’s time to wash your extensions, follow these steps: Pre-condition the hair and use a sulphate-free shampoo. Rinse with cold water to close the cuticles and lock in moisture. These simple habits can make all the difference in keeping your extensions smooth and manageable. Daily Anti-Tangle Routine Consistency is key to keeping your extensions looking their best. A daily care routine can help prevent tangles and matting. Morning Care: Gently separate the extensions at the roots to avoid pulling. Use a wide-tooth comb, starting at the ends and working up to the roots. Apply a moisturising serum to the mid-lengths and ends for added smoothness. Evening Care: Remove clip-in extensions before going to bed. Loosen permanent extensions and braid them loosely. Sleep on a silk pillowcase to minimise friction. Extra Tips for Swimming or Workouts: Secure your hair in a tight braid to prevent tangling. Wear a swimming cap to protect the extensions. Steer clear of chlorinated water, which can dry out and damage the hair. Stopping Extension Shedding What Causes Shedding Did you know that hair extensions naturally shed around 50–100 hairs a day? While this is normal, excessive shedding often comes down to preventable issues like incorrect installation, rough handling, or even exposure to harsh conditions. Cause Impact Prevention Improper installation Extensions may slip and detach Get them installed by a pro Rough handling Hair breaks at attachment points Brush gently with care Environmental stress Hair dries out and gets damaged Use protective hair care products Understanding these factors shows why proper care is so important. How to Reduce Shedding Minimising shedding starts with tackling the root causes. A good care routine can make all the difference: Daily Care Tips: Use a loop brush or wide-tooth comb, starting at the ends and working your way up while supporting the bonds. Apply a lightweight oil from the mid-shaft to the ends, steering clear of the bonds. Sleep on a silk pillowcase to reduce friction and keep your extensions smooth. Washing and Styling: Washing Technique Gently massage a sulfate-free shampoo through your extensions using lukewarm water. For a thorough clean, double shampoo if needed. Heat Protection Always use a heat protectant spray and stick to low heat settings when styling. Whenever you can, let your extensions air dry instead. Maintenance Schedule Regular professional touch-ups help keep your extensions secure and in top shape. "Extensions shed more when care routines are rushed. A consistent regimen not only protects your hair but also saves money by preventing damage". Pro Tips for Longevity: Reinforce new wefts by sealing them with fabric glue. Avoid chemical treatments near the bonds to prevent weakening. Keep your extensions hydrated, but avoid applying moisture directly to the attachment points. When not in use, store your extensions in a cool, dry place to maintain their quality. Matching Extension Colours Why Colours Don't Match Getting hair extensions to match perfectly with your natural hair can be tricky. Natural hair often has subtle colour variations - like lighter ends or darker roots - while extensions usually come in a uniform shade. Here are some common factors that can affect colour matching: Factor Impact Solution Sun exposure Natural hair lightens unevenly Match extensions to the mid-lengths, not roots Lighting conditions Colours look different in various lights Take photos of your hair in natural daylight Hair undertones Warm or cool tones change overall look Choose shades that complement your skin tone These considerations are key to achieving a more accurate match. Silkara Hair Colour Matching Silkara Hair specialises in colour matching tailored to Australian hair types and conditions. Their service takes the guesswork out of the process with a colour match guarantee - offering free replacement sets until the match is just right. To get started, take photos of your hair in natural, indirect light, ideally mid-morning or early afternoon. Focus on capturing your hair’s mid-lengths, ends, highlights, and lowlights from different angles. Blending Extension Colours Matching the colour is just the first step; blending the extensions with your natural hair is what creates a flawless, natural look. A seamless blend requires more than just a good colour match - it’s all about styling. Styling tips for a natural blend: Layer the extensions to add depth and dimension. Use heat tools to style your natural hair and extensions together. Opt for loose waves to disguise minor differences in colour. Keep up with regular trims to maintain a polished appearance. Pro tip: Focus on matching your extensions to your hair’s mid-lengths and ends, as these areas are more visible than the roots. For warm skin tones, go for extensions with yellow or red undertones, while neutral or blue-based shades work better for cool skin tones. When using heat tools, always protect both your natural hair and extensions with heat protection products. This helps preserve the colour and prevents damage that could affect the overall look. Finally, schedule touch-ups every 6–8 weeks to keep your extensions matching as your hair grows and changes. Regular trims and professional maintenance are essential to keeping everything looking cohesive. Proper Installation Methods Installation Mistakes to Avoid A poor installation can harm your hair and lead to unnecessary repair costs. Here's what to watch out for: Weight Distribution Issues: Overloading your hair with too many extensions can put undue stress on your follicles, potentially leading to damage. Tension Problems: Extensions that are installed too tightly - especially sew-ins - can cause traction alopecia, a type of hair loss triggered by repeated pulling. If you feel discomfort, don't hesitate to ask your stylist to adjust the tension. Proper installation not only ensures your extensions look natural but also supports their longevity and keeps your hair healthy. Correct Installation Steps For tape-ins and sew-ins, professional installation is a must. Each hair type requires a tailored approach to achieve the best results: Fine/Thin Hair: Nano Tip Extensions are an excellent choice as they're 90% smaller than traditional micro rings, making them nearly invisible. Their lightweight design ensures even weight distribution, reducing strain on delicate hair. Medium/Thick Hair: Tape-In Extensions are ideal for quick application and flawless blending. These extensions lie flat against the scalp, avoiding bulk and making them comfortable for daily wear. "Make sure you have your extensions fitted by a professional to ensure a safe fitting and removal." – Sarah Mckenna, Founder, Vixen & Blush Installation Guidelines: Pre-Installation Assessment: Your stylist should assess your hair's texture, density, scalp health, chemical treatment history, and growth patterns to determine the best approach. Preparation Process: Start with a clarifying shampoo to remove any residue, then dry your hair completely. Precise sectioning and scalp protection are key steps before applying extensions. Application Technique: Extensions should be applied using clean and accurate partings, consistent spacing, and the right adhesives or attachments. Throughout the process, tension levels must be monitored to avoid discomfort or damage. "Extensions should enhance your natural beauty - not compromise it! With proper application care and maintenance, you can enjoy the volume and length of your dreams while keeping your natural hair in great condition." – Blonde Faith Salon To maintain your extensions, schedule professional check-ups every 6–8 weeks. Next, discover how to protect your extensions from Australia's challenging weather conditions. sbb-itb-08feb2f Weather Protection for Extensions Heat and Humidity Effects Australia's climate - with its scorching temperatures, intense UV rays, and high humidity - can take a toll on hair extensions, impacting their appearance and durability. UV Damage: Prolonged exposure to the sun can make extensions dry, brittle, and prone to colour fading. Unlike natural hair, extensions lack the natural protection provided by scalp oils, leaving them more vulnerable to UV damage. Humidity's Impact: High humidity levels can wreak havoc on extensions by causing the hair cuticle to swell. This often leads to: Unmanageable frizz and puffiness Adhesive bonds weakening over time Tangling and knotting becoming more frequent Temperature Stress: When temperatures climb above 30°C, the bonds holding extensions in place can weaken, and the hair itself may become excessively dry. These weather-related challenges make a consistent protective routine essential for maintaining extension health. Weather Protection Tips Daily Protection Routine: Start your day by applying a lightweight, water-based leave-in conditioner. This helps create a barrier against humidity. For extra care, use a lightweight reconstructor infused with Australian Aloe Vera and Quandong Extract, as recommended by Silkara Hair, to shield your extensions from environmental stress. Heat Defence: Always use a heat protectant spray before stepping out into the sun or using heat styling tools. "One of the most effective ways to protect your hair extensions from the sun or heat damage is by using a heat protectant spray. This acts as a barrier between your hair and the sun's harmful rays." – Cliphair UK Seasonal Care Guide: Season Protection Strategies Recommended Products Summer • Wear wide-brimmed hats • UV protection spray • Rinse before and after swimming • Leave-in conditioner • Minimise heat styling • Chlorine-neutralising shampoo Winter • Use extra moisturising products • Moisturising shampoo • Consider using a humidifier • Argan oil treatments • Anti-frizz serum Incorporate these seasonal tips into your routine to keep your extensions looking their best throughout the year. Night-time Protection: Before bed, secure your extensions in a loose braid or wrap them in silk to minimise frizz caused by overnight humidity. This simple step can make mornings much easier. Swimming Protection: Swimming can be particularly harsh on extensions, so follow these steps to protect them: Apply a water-resistant leave-in conditioner before swimming. Use a swimming cap or tie your hair into a protective style. Rinse your extensions thoroughly with fresh water after swimming. Use a specialised after-swim treatment to remove chlorine or salt. For best results, wash your extensions every 7–10 days with sulfate-free products, and finish with a cold water rinse to seal the cuticle. Conclusion Extension Care Summary Taking consistent and proper care of your hair extensions can make a world of difference, potentially extending their lifespan to as long as 12 months, according to research. The secret lies in sticking to a few essential practices that keep your extensions looking and feeling their best. Daily Care Essentials: Brush gently twice a day using tools designed specifically for extensions. Apply a moisturising oil to the mid-lengths and ends to keep them hydrated. Sleep on silk or satin pillowcases to minimise friction and reduce tangling. Weekly Maintenance: Wash your extensions 2-3 times a week with sulfate-free products, and treat them to a deep conditioning session once or twice a month. These steps create a solid foundation for maintaining their health and appearance. If you're looking for products tailored to your extension care routine, consider Silkara Hair’s range, designed to make maintenance easier and more effective. Silkara Hair Products and Care Silkara Hair offers a premium collection of products that address common extension care challenges, making your routine simpler and more effective. Here’s a quick look at their essentials: Care Category Essential Products Benefits Daily Care Detangling Brush Prevents damage while gently detangling bonds Protection Heat Protectant Spray Shields extensions from heat damage up to 230°C Maintenance Sulfate-free Shampoo Helps maintain the integrity of your extensions Overnight Care Silk Pillowcase Reduces friction and prevents tangling while you sleep Protection Tips: Always apply a heat protectant before styling with hot tools. Stick to brushes that are safe for extensions to avoid unnecessary pulling or breakage. Steer clear of chlorinated water, as it can weaken bonds and dry out the hair. Keep extensions hydrated by using regular oil treatments. Maintaining Extensions: How to Protect, Style, and Wash Hair Extensions | Sephora You Ask, We Answer FAQs What are the best hair extensions for Australia's changing climate? Choosing Hair Extensions for Australia's Climate Australia's diverse climate calls for hair extensions that can adapt to the changing weather while maintaining their quality and appearance. During the humid summer months, lightweight, natural hair extensions are a fantastic choice. They’re less prone to tangling and handle moisture more effectively, making them easier to manage. To keep both your extensions and natural hair in great condition, use sulfate-free shampoos and hydrating conditioners - these products help maintain moisture and prevent damage. When the air turns dry, especially in cooler months, it’s wise to switch to extensions that focus on moisture retention. Look for options enriched with nourishing oils or specifically designed to fight dryness. These can protect your hair from the harsh effects of dry air, keeping your locks looking smooth and healthy. By choosing extensions that align with the season and following a thoughtful care routine, you can enjoy stunning, long-lasting hair no matter the weather. How can I take care of my hair extensions during workouts or swimming? To keep your hair extensions looking their best during workouts or swimming, here are some practical tips to follow: Secure your extensions: Style your hair into a braid or a low bun to prevent tangling and minimise friction. A silk or satin scrunchie is a great choice to reduce potential damage. Shield them from water: Before hitting the pool, apply a lightweight leave-in conditioner to create a barrier against chlorine or saltwater. For added protection, consider wearing a swim cap. Rinse and rehydrate: After swimming, rinse your hair thoroughly with fresh water to wash away chlorine or salt. Follow up with a leave-in conditioner to restore moisture and maintain softness. Stick to these steps and schedule maintenance appointments every 6–8 weeks to keep your extensions in top condition and extend their lifespan. How can I make sure my hair extensions blend naturally with my multi-toned hair? To make your hair extensions blend effortlessly with your multi-toned natural hair, start by examining your hair under natural light. This helps you pinpoint its true colour and undertones - whether they're warm, cool, or neutral. Select extensions that align with your base colour and feature highlights or lowlights to mimic the natural depth and variation of your hair. Using colour swatches can be a game-changer when choosing extensions, ensuring you get the closest match. For an even better outcome, consult a professional stylist. They can layer and trim the extensions to merge seamlessly with your hair, eliminating any visible lines. After application, style both your hair and extensions together to create a polished, unified look that works beautifully in any lighting. Related posts How to Trim Hair Extensions at Home How to Wash Clip-In Hair Extensions: Step-by-Step Care Guide 5 Quick Hairstyles Using Clip-In Extensions Hair Extension FAQ: Top Questions Answered
Learn more
Hair Extension Care: 8 Essential Maintenance Tips
Hair extensions are a big investment, and keeping them in great condition requires proper care. Here’s a quick guide to maintaining your extensions, especially in Australia’s challenging climate: Brushing: Use the right brush (e.g., loop brush for weaves, boar bristle for clip-ins) and brush 2–3 times daily to prevent tangling. Washing: Stick to sulfate-free, hydrating shampoos and conditioners. Wash extensions based on type (e.g., clip-ins after 12–15 uses, tape-ins 1–2 times weekly). Heat Styling: Always use a heat protectant and keep tools below 180°C to minimise damage. Moisturising: Extensions need extra hydration since they don’t benefit from natural scalp oils. Use leave-in conditioners and deep treatments regularly. Swimming Protection: Rinse with fresh water before swimming, apply leave-in conditioner, and use protective styles like braids or buns. Overnight Care: Sleep on silk pillowcases, and secure extensions in loose braids or buns to prevent tangling. Professional Maintenance: Schedule regular salon visits based on your extension type (e.g., tape-ins every 4–8 weeks). Right Products: Avoid sulfates, parabens, heavy oils, and dimethicone. Opt for hydrating, lightweight formulas that protect bonds and hair. Quick Tip: Protect your extensions from Australia’s sun and humidity with UV sprays and anti-humidity products. Regular care ensures they last up to 12 months while looking natural and polished. How to Properly Maintain Your Hair Extensions 1. How to Brush Extensions Without Tangles Brushing your extensions the right way is crucial, especially in Australia's humid climate. It not only keeps tangles at bay but also helps your extensions last longer. Incorporating these brushing tips into your daily routine can protect your investment and keep your hair looking flawless. Hair stylist Kristin Leigh highlights the importance of brushing, saying: "Brushing is the foundation of your home care!" "Matting and tangling only occur when extensions are not properly brushed." The secret to tangle-free extensions lies in both when and how you brush them. Morning Routine Start your day by holding your extensions at the root. Use gentle, short strokes, brushing from the tips upward. This technique reduces stress on the attachment points and keeps your extensions secure. Throughout the Day Carry a specialised extension brush for touch-ups. The type of brush you need depends on the kind of extensions you have: Extension Type Recommended Brush Price Range (AUD) Permanent/Weave Loop Brush $24.00 - $29.00 Clip-ins/Halo Boar Bristle Paddle $24.50 - $54.00 Wet Hair Detangling Brush $19.90 - $26.00 Evening Care Before bed, gently brush your dry extensions and loosely braid them to prevent tangles overnight. This simple step can save you a lot of hassle in the morning. Essential Brushing Tips Keep permanent extensions in a low ponytail while brushing. If your extensions feel dry, use a leave-in conditioner for added moisture. Avoid brushes with balls on the bristle tips, as they can snag the hair. Use your fingers to carefully work through stubborn tangles. Brush temporary extensions before attaching them to ensure they stay smooth. Wicked Roots Hair™ also recommends using a detangling comb, stating: "Using a detangling comb for extensions will help to remove tangles without causing damage." For best results, aim to brush your extensions 2–3 times a day. This routine not only prevents matting near the scalp but also keeps your extensions looking natural and polished. 2. Washing Extensions with Gentle Products Taking care of your extensions starts with how you wash them. According to hair extension expert Megan McCauley: "The main rule when it comes to hair care products for your extensions is to make sure you're using products that keep your hair hydrated, rather than drying it out." How Often Should You Wash? The right washing frequency depends on the type of extensions you have. Here's a quick guide: Extension Type Recommended Washing Frequency Special Care Notes Clip-ins Every 12–15 uses Always remove before washing Tape Hair 1–2 times weekly Avoid applying conditioner near the roots Nano/Micro Ring 1–2 times weekly (max 3) Pay attention to attachment points Weave Once weekly maximum Clean gently at the base Prepping for a Wash Before you even turn on the tap, make sure your extensions are tangle-free. Use lukewarm water (around 35°C), as hot water can weaken the fibres. Choose high-quality, hydrating products designed to maintain moisture and protect the hair. Must-Have Products Picking the right products is key to keeping your extensions in top shape. Look for these: Product Type Price Range (AUD) Purpose Colour Security Shampoo $24.00 Sulfate-free cleanser to protect hair Colour Security Conditioner $24.00 Adds moisture without weighing hair down Chris Appleton + Color Wow Money Masque $45.00 Bi-weekly deep conditioning treatment The Right Washing Technique When it's time to wash, use a mild, sulfate-free shampoo and apply it with gentle downward motions. Skip vigorous scrubbing or circular movements to avoid tangling. Focus conditioner on the mid-lengths and ends, steering clear of the roots and attachment areas. For best results: Double cleanse your scalp and apply a detangling spray for stubborn knots. Rinse thoroughly to remove all product residue. Gently blot your extensions dry with a microfibre towel - don’t rub! What to Avoid in Products Even with the perfect washing routine, the wrong ingredients can cause damage. Steer clear of products containing: Sulfates and parabens Dimethicone Sodium hydroxide Moroccan or coconut oil Silicon-based ingredients Abbey Wilson from Cliphair US highlights: "'How often should I wash my hair with extensions?' is one of the most frequently asked questions we get from our customers so today we've dedicated an entire blog to it!" For days when washing isn't needed, a good dry shampoo can refresh your extensions. This keeps them looking their best while avoiding over-washing, which can shorten their lifespan. 3. Safe Heat Styling Methods Heat styling can elevate your look, but it’s crucial to use the right techniques and temperatures to minimise damage, especially when working with extensions. Temperature Guidelines Each styling tool has an ideal temperature range to ensure safe use with your extensions. Here's a quick reference: Styling Tool Safe Temperature Range Recommended Setting Hair Dryer 150–180°C Medium Straightener 180–210°C Adjust based on your hair type Curling Tongs 130–180°C Start low and increase gradually Heated Rollers 100–130°C Medium Before using any heat tools, always apply a heat protectant to safeguard your extensions. Essential Heat Protection A heat protectant spray is your first line of defence against damage. Experts at BELLAMI Hair highlight the importance of this step: "Our heat-activated spray relies on our proprietary Vita-Seal™ Complex to smooth hair and protect it from heat damage and humidity while ChromoHance™ polymer improves colour vibrancy." If you’re shopping for heat protectants in Australia, here are some top-rated options: Product Price (AUD) Best For L'Oreal Color Vibrancy Dual Protect $50.00 Colour-treated extensions Total Defense Spray $40.00 All-round protection Matrix Total Results Length Goals Perfector $15.00 Long extensions Safe Styling and Damage Prevention To keep your extensions looking flawless, follow these heat styling tips: Use high-quality ceramic or tourmaline tools for even heat distribution. Keep tools moving continuously to avoid heat damage in one spot. Style in small sections to ensure consistent results. Limit heat styling to a few times a week to reduce stress on your hair. Use the cool shot function on your hair dryer to set your style. Glide straighteners smoothly from root to tip without pausing. When curling, hold each section for no longer than 8–10 seconds. Always start with the lowest temperature that gets the job done, increasing only if absolutely necessary. This approach not only protects your extensions but also keeps them looking their best for longer. 4. Keeping Extensions Moisturised Managing moisture is essential for maintaining extensions, especially in Australia's often dry climate. Since extensions don't benefit from natural scalp oils, they need extra attention to stay hydrated and maintain their shine. Daily Moisture Routine To keep extensions hydrated, consistency is key. A simple daily routine with the right products can make all the difference: Time of Day Care Step Suggested Product Morning Light hydration Leave-in conditioner or serum Mid-day Quick touch-up Hair mist or light oil Evening Deep hydration Natural oils or intensive treatments Must-Have Moisturising Products A weekly restorative treatment mask, particularly one with active ingredients like Alpha-Keratin 60ku, can work wonders for improving texture and manageability. Consider adding these products to your regimen for healthier extensions: Product How Often to Use Key Benefits Sulphate-free Shampoo 1–2 times a week Helps retain moisture Deep Conditioning Mask Every 1–2 weeks Delivers intense hydration Leave-in Conditioner Daily Provides ongoing moisture Natural Hair Oils 1–2 times daily Locks in hydration Adapting to Australia's Climate Australia's climate poses unique challenges for extensions, so adjusting your routine to match the weather is essential. During dry spells, increase the frequency of moisturising and use lighter oils. A UV protectant spray can also help shield extensions from sun damage. Studies suggest that following a three-step approach - nourish, hydrate, and protect - can extend the lifespan of extensions by up to 50%. Expert Advice Here are some practical tips to keep your extensions moisturised and in top condition: Focus oils on the mid-lengths and ends, steering clear of the roots. Wash with lukewarm water to prevent moisture loss. Let extensions air-dry whenever possible. Adjust your routine based on your activities and the weather. 5. Protecting Extensions While Swimming Swimming and beach trips can be tough on hair extensions. Chlorine, salt water, and sun exposure can leave them dry, tangled, discoloured, and even weaken adhesive bonds. But with a few simple precautions, you can keep your extensions in great shape. Pre-swim Protection Before you dive in, take a moment to prepare your extensions. Start by wetting them with fresh water, then apply a leave-in conditioner to the mid-lengths and ends. This creates a barrier against harmful elements. Swimming Environment Recommended Protection Additional Care Pool Silicone swim cap + leave-in conditioner Keep an eye on water temperature Beach UV protection spray + protective styling Reapply every 2 hours Spa/Hot Springs Waterproof neoprene scrunchie + protective spray Limit time in the water Protective Styling How you style your hair before swimming matters. Bianca Arussi suggests: "I recommend keeping hair braided or in a low bun while swimming to help avoid tangles [...] But not in a ponytail, as this only adds extra tension on the keratin bonds." Braids or low buns are ideal as they minimise tangling and reduce stress on the bonds. Post-swim Care Protocol Once you're out of the water, follow these steps to minimise damage: Rinse your hair immediately with cool, fresh water. Use a sulphate-free clarifying shampoo to wash your hair. Apply conditioner, avoiding the bonds. Gently pat dry with a microfibre towel. Finish with a UV-protective leave-in conditioner. Sun Protection Strategies The Australian sun can be harsh, so it's crucial to shield your extensions. Here’s how: Time of Day Protection Method Duration Morning (Before 10:00) Light UV spray 2–3 hours Peak Hours (10:00–16:00) Wide-brimmed hat and protective styling Entire duration Late Afternoon UV-protective leave-in treatment 2–3 hours As noted by experts: "Hydration is the key to keeping your extensions healthy and damage free throughout the warmer months, investing in the correct products as mentioned in our blog will go a long way in protecting your hair." Extension Type Considerations Not all extensions are created equal when it comes to water activities. Permanent extensions like I-tips or tapes tend to handle swimming better. On the other hand, clip-in extensions should always be removed before swimming to preserve their quality. sbb-itb-08feb2f 6. Overnight Care Tips Your nighttime routine is just as critical as your daily care steps when it comes to maintaining the longevity and quality of your extensions. By taking a few extra precautions before bed, you can protect your extensions and wake up with fewer tangles and less damage. Essential Pre-bed Preparation Make sure your hair is completely dry before heading to bed. Sleeping with wet extensions can weaken the bonds and lead to breakage. Use a microfiber towel to dry your hair thoroughly, and gently detangle from the ends upward to avoid unnecessary stress on the bonds. Protective Styling Options Once your hair is dry, choose a protective style to reduce overnight friction and tangling. Loose braids, low ponytails, or buns are great options to keep your extensions secure while you sleep. Celebrity hair stylist Andre Walker highlights the benefits of silk pillowcases for overnight care: "Silk pillowcases help to maintain your style, in addition to keeping your curls and coils from frizzing and straightening out." Bedding Essentials Silk pillowcases are a game-changer for reducing friction - by up to 43%. Look for high-quality silk (22 momme or higher) or premium satin options. Popular choices include Slip Silk (A$79) and Lilysilk 25 Momme Oxford (A$92). These materials not only protect your extensions but also feel luxurious to sleep on. Sleep Position Matters How you sleep can also affect your extensions. Sleeping on your back is ideal, as it minimises friction and reduces the pressure on the bonds. If you tend to move around a lot during the night, consider wearing a silk bonnet or wrapping your hair for added protection. Hydration Strategy Before bed, apply a lightweight leave-in conditioner or serum to the mid-lengths and ends of your hair. Be sure to avoid the bonds to prevent any weakening of the adhesive. Certified trichologist Bridgette Hill advises: "My expert advice is [to] use what works best for your sleeping situation and hair texture, type, and length." 7. When to Schedule Maintenance Once you've nailed your overnight care routine, it's time to think about regular salon visits. Scheduling maintenance appointments is key to keeping your extensions looking great and protecting your natural hair. Maintenance Schedules by Extension Type Here's a quick guide to how often you should plan your salon visits based on the type of extensions you have: Extension Type Maintenance Interval Key Maintenance Points Tape-ins 4–8 weeks Move-up appointments, adhesive replacement Hand-tied Wefts 4–6 weeks Alternate between quick and full move-ups Kera-Link 6–8 weeks Bond inspection and adjustment Beaded Extensions 6–8 weeks Tighten and reposition beads Micro-links 10–12 weeks Inspect and adjust links Fusion Hair 12–14 weeks Check and reapply bonds Clip-ins No salon maintenance Regular at-home care only Signs It's Time for Maintenance If you're unsure whether it's time for a touch-up, keep an eye out for these signs: Bonds or attachments are visible Bonds feel loose Tangling happens more often Styling becomes challenging Extensions feel uncomfortably tight Regular check-ins with your stylist can help catch these issues early, keeping both your extensions and natural hair in great shape. If you notice any of these signs, it’s a good idea to book your next appointment. Why Professional Maintenance Matters Routine salon visits aren’t just about keeping your extensions looking flawless - they also come with some important benefits: Prevents matting and tangling Keeps an eye on the health of your natural hair Ensures proper growth and attachment Fixes minor problems before they worsen Maintains a seamless, natural look When planning your maintenance, it's worth discussing costs with your stylist so you can budget accordingly. Many salons offer reminders and packages to make staying on schedule easier. Keep in mind that these are general recommendations. Your stylist can create a maintenance plan tailored to your specific hair type and lifestyle. 8. Choosing the Right Hair Products When it comes to keeping your extensions in top-notch condition, the products you use play a huge role. Gentle, hydrating formulas are your best bet for protecting both your extensions and the bonds holding them in place. What to Look for in Hair Products Stick to formulas that are free from sulfates, alcohol, silicones, and parabens. These ingredients can strip your extensions of moisture or weaken the bonds, leading to damage over time. Recommended Products and Ingredients Here’s a quick guide to help you choose the right products: Product Type Ingredients to Look For Ingredients to Avoid Shampoo Aloe vera, biotin, chamomile Sodium hydroxide, sulfates Conditioner Argan oil, silk protein Dimethicone, quaternium Treatment Hyaluronic acid, squalane Heavy oils, keratin protein Styling Light-hold polymers Wax, alcohol-based products Expert-Approved Picks Hair specialist Robbie Sue recommends the Amika Hydro Rush Shampoo & Conditioner. These products are packed with hyaluronic acid and squalane, making them ideal for keeping your extensions hydrated and minimising breakage. Hydration Tips for Extensions To keep your extensions moisturised and looking natural: Swap your conditioner for a hydrating mask once or twice a month. This gives your extensions an extra boost without overloading them. Use lightweight oils on the mid-lengths and ends to lock in moisture without weighing down the hair. Avoid applying moisturising products near bonds or tape, as this can weaken the adhesive. Ingredients and Products to Avoid Some products can do more harm than good. Steer clear of: Tea tree shampoo Dandruff treatments Heavy coconut oil Dry shampoo Protein-heavy formulas These can strip moisture, weaken bonds, or leave residue that’s hard to remove. Storing Your Products To get the most out of your hair care products, store them in a cool, dry place, away from direct sunlight. If you’re travelling, transfer your favourites into smaller containers instead of buying travel-sized versions, which might have different formulations. The right storage and products can make all the difference in maintaining the longevity and appearance of your extensions. Extension Care Quick Guide This guide highlights essential care practices to help maintain your extensions in Australia's diverse climate. For more detailed instructions, refer to the sections above. Care Requirements by Extension Type Extension Type Washing Schedule Heat Styling Guidelines Australian Climate Tips Human Hair Clip-ins 2–3 times per week Use heat up to 180°C Rinse after swimming and apply a UV protectant Tape Extensions 2–3 times per week Use low heat; follow product instructions Add extra moisture protection in dry conditions Halo Extensions Follow manufacturer guidelines For human hair, use heat up to 180°C; otherwise, use low heat Store in a protective case when not in use Ponytail Extensions Follow manufacturer guidelines Use low heat; follow product recommendations Apply anti-humidity spray during summer These care tips are tailored to each extension type and take into account Australia's climate and seasonal changes. Climate-Specific Care Tips Australia's weather, especially the humid summers, can be tough on extensions. To keep them in top shape: Choose lightweight, humidity-resistant products. Always apply UV protection when spending time outdoors. After swimming, rinse extensions thoroughly with fresh water. Store your extensions properly to shield them from environmental damage. Seasonal Adjustments Summer Care: Before swimming, apply a leave-in conditioner to shield extensions from chlorine and saltwater. After a beach day, rinse them immediately with fresh water and use a gentle clarifying shampoo to remove salt build-up. Winter Care: Deep condition your extensions weekly to combat dryness and reduce heat styling to prevent brittleness. Swimming activities require special attention, as detailed below. Swimming Protection Guide Swimming Type Pre-Care Post-Care Beach Swimming Apply leave-in conditioner as a barrier Rinse with fresh water and wash with a gentle clarifying shampoo Pool Swimming Rinse hair with fresh water before entering Use a clarifying shampoo and follow up with a moisturising treatment Temperature Guide for Styling When styling, keep temperatures below 180°C for straighteners and curling tools. Use a cool setting when blow-drying or, better yet, allow extensions to air-dry. Always apply a heat protectant before using any heated tools. Maintenance Schedule Brush your extensions gently every day to avoid tangles. Deep condition them weekly to maintain softness and hydration. Adjust your routine depending on factors like sun exposure or frequent swimming. Summary Taking care of your hair extensions is essential to keep them looking great and lasting as long as possible. A consistent routine that includes gentle handling and high-quality products can make a big difference. As mentioned earlier, the lifespan of extensions varies depending on the type. To keep them in top condition, opt for sulfate-free, hydrating products that maintain their shine and protect against the challenges of Australia's climate. When styling, always use a heat protectant and stick to low or medium heat settings to avoid unnecessary damage. It's also important to shield your extensions from environmental factors. Australia's scorching summer sun and salty ocean water can be tough on hair, but taking the right precautions can help maintain their quality. In addition to daily care, regular professional maintenance is key. Some essential habits to follow include: Using gentle brushing techniques with the right tools Separating bonds frequently to prevent tangling Styling your hair in protective ways before bed Applying moisturising products once or twice a day FAQs How can I care for my hair extensions in Australia's climate? Australia's weather, with its high humidity and intense sun, can be challenging for maintaining hair extensions. But with the right care, you can keep them looking flawless: Shield from humidity and UV rays: Apply anti-humidity sprays and UV protectants made specifically for hair extensions. This helps to keep frizz at bay and prevents colour from fading. Pre-swim preparation: Before diving into a pool or the ocean, wet your hair with fresh water. This reduces how much chlorine or salt water it absorbs. After swimming, rinse thoroughly and use a sulphate-free shampoo and conditioner to cleanse and hydrate. Limit heat exposure: Avoid overusing heat styling tools, as combining high temperatures with sun exposure can weaken extensions. If you do use them, always apply a heat protectant first. Be gentle: Opt for a wide-toothed comb to detangle your extensions carefully, and steer clear of harsh hair accessories that might lead to breakage. These simple steps can help your extensions stay smooth, vibrant, and long-lasting, even under Australia's tough weather conditions. How can I care for my hair extensions while swimming? To keep your hair extensions in top shape while swimming, try these simple yet effective tips: Rinse with fresh water first: Wetting your hair with clean water before diving in helps reduce how much chlorine or salt your extensions absorb. Apply a leave-in conditioner: This adds a protective barrier, shielding your hair from harsh chemicals or salt. Secure your hair: Styling it in a braid or bun can prevent annoying tangles. Consider a swim cap: If you can, wear one to minimise water and chemical exposure. Rinse immediately after swimming: Use fresh water to wash away chlorine or salt, then gently detangle with a wide-tooth comb. Use gentle products: Wash with a sulphate-free shampoo and conditioner to restore lost moisture. Try to limit how long your extensions are exposed to chlorinated or salty water, as it can affect their longevity. These steps will let you enjoy a swim without compromising the look and feel of your extensions. How often should I get professional maintenance for my hair extensions? For most hair extensions, it’s a good idea to schedule professional maintenance every 4 to 8 weeks, though this can vary based on the type of extensions you have and how fast your natural hair grows. For instance, tape extensions typically need to be adjusted every 6 to 8 weeks, while other options like wefts or keratin bonds might call for more frequent check-ins. Keeping up with regular maintenance helps your extensions stay secure, blend naturally with your hair, and avoid putting unnecessary strain on your scalp. It’s always best to chat with your stylist for tailored advice that suits your hair type and the extensions you’re using. Related posts How to Wash Clip-In Hair Extensions: Step-by-Step Care Guide 5 Quick Hairstyles Using Clip-In Extensions Common Hair Extension Problems and Solutions Factors Affecting Human Hair Extensions Durability
Learn more
Synthetic vs Human Hair Extensions: Which Should You Choose?
Not sure whether to go for synthetic or human hair extensions? Here's a quick guide: Human Hair Extensions: Last up to 12 months, can be heat-styled, dyed, and trimmed, but cost more upfront. They look and feel natural, require regular care, and are ideal for daily wear. Synthetic Hair Extensions: Budget-friendly, pre-styled, and low-maintenance, but only last 1–3 months. They offer limited styling options and may appear shinier than natural hair. Quick Comparison: Feature Human Hair Extensions Synthetic Hair Extensions Lifespan Up to 12+ months 1–3 months Styling Options Heat-styling, dyeing Limited, pre-styled Look Natural May appear shiny Maintenance Regular care needed Minimal upkeep Cost (AUD) $200–$4,000 $20–$400 Key takeaway: Choose human hair for versatility and durability, or synthetic hair for affordability and convenience. Your decision depends on your budget, lifestyle, and styling needs. Synthetic vs Human Hair: Main Differences Look and Feel When it comes to extensions, texture and appearance are everything. Human hair extensions offer a natural texture that blends seamlessly with your own hair, moving and behaving just like the real thing. Synthetic extensions, on the other hand, tend to feel firmer and have a noticeable shine that can sometimes look less natural. While advancements in synthetic hair technology have improved their look, they still fall short of perfectly mimicking the natural lustre of human hair. "The most prominent advantage of human hair extensions is their authentic look and texture. Human hair blends seamlessly with your natural hair." - ONYC® Hair Team These differences in texture also play a big role in how each type of extension responds to styling, as outlined below. Styling Options Styling Feature Human Hair Extensions Synthetic Extensions Heat Styling Works safely with all heat tools Limited to heat-resistant varieties only Colouring Can be dyed darker or toned Cannot be coloured Cutting/Trimming Can be cut and shaped Pre-styled only Chemical Processing Compatible with treatments Not recommended Human hair extensions are incredibly versatile - they can handle heat styling, colouring, and even trimming, just like your natural hair. However, if you're planning a major colour change, it's best to consult a licensed stylist for professional results. Synthetic extensions, on the other hand, come with limitations. Standard synthetic varieties can only tolerate low heat, while heat-resistant types can handle moderate temperatures. And unlike human hair, synthetic extensions cannot be coloured. As Cliphair US explained in March 2025, "Human hair extensions are the only type of hair that you are able to dye. Synthetic or artificial hair extensions will repel colour and not take or change at all". If you're working with heat-resistant synthetic extensions, keep these tips in mind: Always follow the manufacturer’s recommended temperature guidelines. Use heat protectants specifically designed for synthetic hair. Test your styling tools on a small section before proceeding. Care and Lifespan How Long They Last When it comes to lifespan, synthetic and human hair extensions are worlds apart. Synthetic extensions usually last between 1–3 months, while human hair extensions can stay in great condition for up to a year - or even longer - if you look after them properly. Here’s a quick overview of how long different types of human hair extensions typically last: Extension Type Average Lifespan Maintenance Interval Clip-in 6–12 months As needed Tape-in 6–8 weeks Every 6–8 weeks Keratin Bonded Up to 6 months Every 6–8 weeks Micro-link Up to 4 months Every 6–8 weeks Sew-in 6–10 weeks Every 6–8 weeks "The average lifespan of synthetic hair extensions is 1–3 months, while the average lifespan of human hair extensions can be up to a year or longer, depending on how they are used and cared for." - Luxy Hair However, lifestyle and environmental factors can affect these timelines. Activities like swimming in chlorinated or salty water, intense workouts, or exposure to extreme weather can shorten the lifespan of both synthetic and human hair extensions. To help your extensions last as long as possible, follow the daily care tips below. Daily Care Guide Taking care of your extensions every day is essential to keeping them looking their best. Here’s how to do it: Brushing and Detangling Brush your extensions twice a day to avoid tangles. Use a wide-tooth comb or a brush specifically designed for extensions. Hold the top of the weft while brushing to minimise tension. Always start brushing from the ends and work your way up gradually. Washing Schedule Human hair extensions: Wash them twice a week using a sulphate-free shampoo. Synthetic hair extensions: Wash only when they look dirty or start to smell. Overnight Protection Secure your hair in a loose braid or a soft ponytail before going to bed. Switch to a silk or satin pillowcase to reduce friction. Make sure your extensions are completely dry before sleeping. Moisture Management Hydrate human hair extensions daily with oils or serums to prevent dryness. Synthetic extensions don’t need as much moisture but should still be kept clean and free of tangles. Temperature Control For human hair extensions: Always use a heat protectant and avoid overusing heated styling tools. For synthetic extensions: Avoid exposing them to temperatures above 180°C (356°F). Human Hair Extensions vs. Synthetic Hair Extensions - The Flat Iron Test | Instant Beauty ♡ sbb-itb-08feb2f Price Comparison When comparing synthetic and human hair extensions, it's essential to weigh both the initial and long-term costs alongside their differences in care and lifespan. Starting Costs The upfront price of hair extensions can vary significantly depending on the type you choose. Synthetic hair extensions typically cost between AUD $20 and $400, while human hair extensions start at AUD $200 and can go as high as $4,000. Extension Type Synthetic Hair Human Hair Clip-in Sets $40 - $160 $150 - $500 Tape-in $100 - $300 $200 - $600 Sew-in/Weave $150 - $350 $200 - $600 Fusion/Keratin $200 - $400 $250 - $1,500 For permanent extensions, you’ll also need to factor in installation costs. For instance, tape-in and sew-in installations typically range from AUD $100 to $200, while fusion/keratin application costs are higher, between AUD $200 and $300. Total Cost Over Time The long-term expenses of hair extensions depend on how often they need replacing and the upkeep required. As mentioned earlier, human hair extensions last longer but demand regular maintenance, especially for permanent styles. Tape-in extensions require salon visits every 6 to 8 weeks, costing around AUD $100 to $150 per session. Fusion/keratin extensions need maintenance every 3 to 4 months, with each session costing about AUD $400. While synthetic extensions are more affordable upfront, their shorter lifespan can result in higher cumulative expenses over time compared to the more durable human hair options. By considering your budget, usage habits, and maintenance preferences, you can determine which type of extension aligns best with your needs. Which Type Suits You Best Occasional vs Daily Use How often you plan to wear extensions plays a big role in choosing the right type. For one-off events or temporary style changes, synthetic extensions are a budget-friendly option that come pre-styled, saving you time and effort. But if you're looking for something to wear every day, human hair extensions are worth the investment. They last longer, can be styled in multiple ways, and handle regular washing and exposure to the elements much better. Here’s a quick guide to help you decide: Usage Pattern Recommended Type Best Extension Style Initial Cost (AUD) Special Events Synthetic Clip-in (14-inch) $114 Weekend Wear Synthetic/Human Halo $650 Daily Use Human Hair Tape-in $600 + $150 installation Of course, beyond how often you wear them, factors like your hair type and the local weather also play a big role in finding the perfect match. Hair Type and Weather Match Australia’s climate can be tough on extensions, thanks to its high humidity and strong UV rays. Human hair extensions are a better match for these conditions because they behave like natural hair. They allow for better ventilation and are easier to style with anti-frizz products. However, they do need some extra care to protect them from UV damage over time. Here’s what works best for different hair types: Fine/Straight Hair Go for lightweight options like clip-ins or tape-ins. Human hair extensions blend more naturally with this hair texture. Use UV-protective sprays during sunny months to maintain quality. Wavy/Curly Hair Pick extensions that match your natural curl or wave pattern. Human hair extensions offer more flexibility for styling. Keep your curls hydrated with a lightweight leave-in conditioner. When dealing with humid conditions: Stick to sulfate-free shampoos and lightweight conditioners to avoid weighing down your hair. Apply anti-frizz serums designed specifically for extensions. On particularly humid days, consider protective styles to minimise frizz. Important Note: While synthetic extensions are less prone to tangling, they don’t breathe as well as human hair, which can make them uncomfortable in hot weather. Final Tips for Choosing When selecting hair extensions, think about what suits your lifestyle and priorities best. Think About Your Investment Timeline If you're looking for something budget-friendly upfront, synthetic extensions are a great pick. On the other hand, human hair extensions are a better option if you're after durability and long-term value. Align with Your Styling Habits Human hair extensions are perfect if you love experimenting with your look. They can handle heat styling, can be coloured to match your natural hair, and work seamlessly with your usual hair care products. Meanwhile, synthetic extensions are more limited - they come pre-styled and don’t react well to heat or dye. Your decision should reflect how much effort you want to put into styling and maintaining your extensions. Your Priority Best Choice Why It Works Special Events Only Synthetic Affordable and ideal for occasional wear Daily Wear Human Hair Offers natural movement and styling flexibility Low Maintenance Synthetic Keeps its style with minimal upkeep Styling Freedom Human Hair Fully compatible with heat and colour treatments For the best results, it’s always a good idea to consult a professional stylist. They can help you pick extensions that suit your hair type and fit seamlessly into your routine. FAQs How can I choose between synthetic and human hair extensions for the best balance of cost and durability? Choosing between synthetic and human hair extensions comes down to your budget, how long you want them to last, and how often you plan to use them. Synthetic extensions are the more budget-friendly option, usually priced between $20 and $100 AUD. They’re ideal for occasional use but tend to have a shorter lifespan, lasting about 1 to 3 months, especially if worn regularly. Human hair extensions, on the other hand, are a pricier choice, ranging from $100 to $600 AUD. However, they’re a long-term investment, with a lifespan of 3 to 12 months or even longer when cared for properly. They offer a more natural look and allow for greater styling options, including heat styling and colouring. If you’re looking for a temporary and cost-effective option, synthetic extensions might be the way to go. But if you want something that looks natural, lasts longer, and offers flexibility, human hair extensions are a better fit. How can I care for human hair extensions to make them last longer? To keep your human hair extensions looking great and lasting longer, here are some practical care tips: Wash with care: Stick to a gentle, sulphate-free shampoo and conditioner to keep your extensions hydrated and prevent them from drying out. Aim to wash them only 1–2 times per week, and avoid overexposing them to water. Brush thoughtfully: Use a wide-tooth comb or an extension-friendly brush to detangle. Always start at the ends and work your way up to avoid unnecessary breakage. Minimise heat styling: Try to limit the use of heat tools like straighteners and curling wands. If you do use them, make sure to apply a heat protectant spray first to shield your extensions. Schedule regular check-ups: Plan a visit to your stylist every 6–8 weeks for professional maintenance, whether it’s re-tightening or checking the overall condition of your extensions. Store safely: When you're not wearing your extensions, store them in a cool, dry spot, preferably in a protective case. This helps prevent tangling and damage. By sticking to these steps, your extensions will stay in great shape and blend naturally with your own hair for a flawless look. Are synthetic hair extensions suitable for everyday use, or are they better for special occasions? Synthetic hair extensions can be a great option for daily wear, but they tend to shine brightest when reserved for occasional use. Why? Their lifespan is typically shorter - lasting about 1 to 3 months with regular use, even with proper care. That said, they’re low-maintenance and easy on the wallet, making them ideal for short-term wear or special events. On the downside, synthetic extensions are more likely to tangle and frizz, especially with frequent use. If you’re after something that looks more natural and can handle the demands of everyday styling, human hair extensions might be worth considering. Think about your daily routine and styling preferences to figure out which option suits you best. Related posts 7 Best Hair Extension Types for Fine Hair: A Complete Guide 5 Quick Hairstyles Using Clip-In Extensions Common Hair Extension Problems and Solutions Hair Extension FAQ: Top Questions Answered
Learn more
5 Quick Hairstyles Using Clip-In Extensions
Clip-in extensions are a simple way to transform your look in minutes. Whether you’re after extra length, volume, or a completely new style, they’re quick, affordable, and don’t require a salon visit. Here’s a snapshot of what you’ll learn: Beach Waves with Volume: Effortless curls for a relaxed vibe. Half-Up Braided Crown: A chic, braided style for any occasion. Full Low Bun: A sleek, elegant updo. Lifted High Ponytail: A voluminous, polished ponytail. Fishtail Side Braid: A stylish and textured braid. Why clip-ins? Easy to apply and remove. Blend naturally with your hair. Can be styled before clipping in. Last up to a year with proper care. Ready to upgrade your hairstyle? Let’s dive in and explore these easy-to-follow looks. 5 QUICK AND EASY HAIRSTYLES WITH EXTENSIONS !!! Getting Your Hair Ready Getting your hair prepped properly is essential for a smooth and long-lasting clip-in extension application. Brush and Smooth Your Hair Start by detangling your hair using a loop hair extensions brush or a soft paddle brush, working gently from the ends upwards. To improve grip without making your hair feel heavy, apply a small amount of lightweight, silicone-free mousse. Once your hair is smooth, section it into defined parts to make the extension placement more precise. Create Tidy Sections Use a rat-tail comb to part your hair horizontally, starting about 5 centimetres above the nape of your neck. This will form the base for the first section. Bottom Section: Part your hair horizontally, 5 centimetres above the nape. Middle Section: Create another horizontal part, about 5–7 centimetres above the bottom section. Top Section: Clip the rest of your hair up with an alligator clip to keep it out of the way. "Keep your extensions at least 2.5 centimetres away from your hairline to maintain a natural appearance". Add Volume at the Roots Creating a secure base at the roots is crucial for keeping your extensions in place all day: Gently backcomb each section with a fine-tooth comb to add texture and grip. Spray lightly with hairspray to enhance hold. If you have fine hair, sprinkle a bit of root-lifting powder at the crown to give your hair extra volume. Taking the time to prepare your hair carefully will not only keep your extensions secure but also help them blend naturally for a flawless look. 5 Quick Extension Hairstyles Beach Waves with Volume Start by applying heat protectant to both your natural hair and extensions. To create those effortless beach waves, clip in your extensions starting from the nape and work upwards in horizontal sections. Use a curling wand (25–38 mm) to curl 5 cm sections of hair away from your face, alternating directions for a natural look. Leave the last 2.5 cm of each strand uncurled for a relaxed finish. Once the curls have cooled, gently run your fingers through them to soften the look. Finally, spritz some sea salt spray to add texture and hold. "Clip-in extensions are perfect for achieving the voluminous, tousled beach look many desire." – Atelier Extensions (January 2025) Half-Up Braided Crown To nail this look, make sure your extensions match the texture of your natural hair. Start by clipping a 4‑clip weft at the nape, a 5‑clip weft at the widest part of your head, and 3‑clip wefts on each side to add extra fullness. Create two Dutch braids starting at your temples and work them backwards. Secure the ends with clear elastics, gently tug the braids for added volume, and pin them together at the back, tucking the ends underneath for a polished finish. Full Low Bun For a sleek and full low bun, clip in your extensions slightly higher than usual. Begin with a 4‑clip weft about 7.5 cm above your nape, layering additional wefts as you move upward. Gather all your hair at the nape, twist it into a loose rope, and wrap it into a bun. Secure the bun with bobby pins, then gently pull the edges to create a fuller look. Wrap a small section of hair around the base of the bun to hide the clips and add a neat touch. Lifted High Ponytail To create a high ponytail with volume, tease the crown of your hair to form a secure base. Clip in your extensions at an upward angle to keep them well-hidden. Start with wider wefts at the nape and work your way up with smaller ones. Gather all your hair into a high ponytail and secure it tightly. Take a small section of hair and wrap it around the base to conceal the elastic, securing it with crossed bobby pins underneath for a polished effect. Fishtail Side Braid For a stylish fishtail braid, clip in your extensions slightly lower on the side you’ve chosen for the braid. Sweep all your hair to that side and divide it into two equal sections. Take small strands from the outer edge of each section and cross them over to the opposite section, repeating the process until you reach the end. Secure with a clear elastic and gently pull at the edges of the braid to create a fuller, more relaxed look. Finish each style with a light mist of hairspray to ensure your extensions stay in place while keeping the movement natural. sbb-itb-08feb2f Extension Care Guide Clean and Store It's good practice to wash your extensions every 10–30 wears or whenever you notice product buildup. Stick to a sulphate-free shampoo, especially if your extensions are colour-treated. Start by filling a sink with lukewarm water. Gently wash each weft, making sure to avoid the clips. Rinse thoroughly, then apply conditioner to the mid-lengths and ends - steer clear of the base. Let the conditioner sit for a few minutes before rinsing with cool water. Pat them dry using a microfibre towel and allow them to air dry completely. When it comes to storage, keep your extensions in a cool, dry spot away from direct sunlight. Roll the wefts neatly and store them in an airtight container or a dedicated storage bag. Always ensure they are completely dry before storing to avoid any risk of mould. Avoid Knots and Wear Detangling is key to keeping your extensions in top shape. Before and after each use, gently detangle by starting at the ends and working your way up. If the extensions are damp, use a wide-tooth comb to minimise breakage. Here’s a simple maintenance routine to follow: Use a soft-bristled brush for gentle detangling. Check the clips and wefts regularly for any signs of wear. When unclipping, start from the bottom and work upwards. Following these steps helps maintain the quality of your extensions, even in tricky conditions like high humidity. Handle Humid Weather Humidity can be tough on extensions, but a few precautions can make all the difference. Apply lightweight anti-frizz products and try these tips: Use a small amount of argan oil on the ends to keep them smooth. Rinse with cold water to seal the cuticles. Make sure your extensions are completely dry before styling. Choose protective hairstyles like braids or buns to minimise exposure. These steps will help your extensions stay sleek and manageable, even on the muggiest of days. Conclusion Clip-in extensions offer an effortless way to upgrade your everyday style, giving you the length and volume needed for a polished, professional look. They’re easy on your natural hair and provide a reliable base for creating hairstyles that last. Whether you’re aiming for soft beach waves or an elegant braided crown, clip-in extensions can transform your look in just minutes. They’re the perfect tool for achieving salon-level styles without the hassle. With a few simple techniques, you can ensure your hairstyle stays flawless all day long. Getting professional-looking results comes down to mastering a few essentials: gentle backcombing, placing the wefts strategically, and blending the extensions seamlessly with your natural hair. By following these tips and our step-by-step guide, you’ll be ready to create stunning, head-turning styles that look effortlessly natural. FAQs How can I pick the best clip-in extensions to match my hair texture and colour? To choose the right clip-in extensions, prioritise texture and colour for a natural and flawless look. Texture: Match the extensions to your hair's natural texture, whether it's straight, wavy, or curly. This helps them blend seamlessly. If your hair is fine, go for lightweight extensions to keep the look natural and comfortable. Colour: Pick extensions that are just 1–2 shades different from your natural hair colour for the best match. For accuracy, compare shades in natural light or seek advice from a professional. By focusing on these details, you'll create a seamless and stylish result with your clip-in extensions. How can I keep my clip-in extensions secure and looking natural all day? To make sure your clip-in extensions stay secure and look natural, start by gently backcombing the roots where the clips will be attached. This creates some texture, giving the clips something to grip onto. Adding a light mist of hairspray at the roots can further improve hold and help prevent any slipping. For a smooth, natural blend, section your hair carefully and layer the extensions evenly. Make sure each clip is fastened tightly. If your hair is on the finer or thinner side, teasing the roots a little more can give you some extra security. To achieve a more natural look, consider trimming the extensions to match your hair's length and texture. By following these steps, your extensions will stay put and look great all day long. How often should I wash my clip-in extensions, and what’s the best way to store them to keep them in great condition? You should wash your clip-in extensions after every 12–15 uses or whenever they start to show signs of product build-up. Overwashing can wear them out faster, so it's best to clean them only when needed. For storage, pick a cool, dry spot away from direct sunlight. Use their original box or a special storage bag to keep them safe from tangling or damage. Taking these steps ensures your extensions stay in great condition and last longer. Related posts 7 Best Hair Extension Types for Fine Hair: A Complete Guide How to Trim Hair Extensions at Home 10 Best Hair Extension Tools for Home Use Factors Affecting Human Hair Extensions Durability
Learn more
How to Wash Clip-In Hair Extensions: Step-by-Step Care Guide
Clip-in hair extensions can last up to 12 months - or even 2 years with proper care. Washing them the right way is key to keeping them soft, shiny, and tangle-free. Here’s what you need to know: Wash Frequency: Every 10–15 wears to avoid product buildup and dryness. Tools Needed: Detangling brush, wide-tooth comb, microfibre towel, and a basin. Products to Use: Sulphate-free shampoo, silicone-free conditioner, and heat protectant spray. Water Temperature: Lukewarm (25–30°C) for washing; cool water for the final rinse. Drying Tips: Air dry flat for 24 hours; avoid wringing or high heat. Quick Steps: Detangle gently before washing. Keep clips dry and use lukewarm water. Shampoo and condition mid-lengths to ends only. Rinse thoroughly and air dry on a flat towel. Avoid hot water, heavy oils, and rough handling to protect your extensions. Proper storage and daily care can also extend their lifespan. How To Wash Clip-In Hair Extensions Required Tools and Products Having the right tools and products is key to gently cleaning your clip-ins and keeping them in great condition for longer. Basic Tools Start with a detangling brush that minimises snagging and breakage. The Silkara Hair Detangling Brush ($24.95 AUD) is a great option, thanks to its gentle bristles. Other essentials include: A wide-tooth comb An extension hanger or a skirt-style clothes hanger A microfibre towel A clean basin for washing A spray bottle for evenly applying products Once you've got your tools, it's time to choose the right washing products. Washing Products Here are some products to keep your extensions soft, shiny, and well-maintained: Product Type Key Features Purpose Sulphate-free Shampoo Gentle cleansers, no harsh chemicals Prevents dryness and retains natural oils Silicone-free Conditioner Natural moisturisers, no residue Keeps extensions soft without buildup Heat Protectant Spray Protects up to 230°C Shields hair from heat styling damage Leave-in Conditioner Lightweight formula Adds moisture between washes To get the best results, look for products with: Aloe vera for hydration Keratin for added strength Argan oil for a healthy shine Silk protein for easier styling "Shampoos all have different cleansing capabilities; therefore, it's important to identify your scalp type before choosing one." - Shab Reslan, Trichologist and Hair Health Advisor at HairClub. What to Avoid Steer clear of products with: Alcohol-based ingredients Heavy oils that can weigh down your extensions All-in-one shampoo and conditioner formulas Dry shampoos, which may cause buildup Finally, always store your care products in a cool, dry place, away from direct sunlight, to maintain their effectiveness. Before You Start Getting things right from the start is key to keeping your clip-in extensions in top shape. Remove Tangles Detangling your extensions before washing helps prevent knots and keeps them smooth: Set Up Your Workspace Lay your extensions flat on a clean surface. Using a hair extension holder can help keep them steady while you work. Section with Care Divide the extensions into smaller, manageable sections using non-slip clips. Spray a lightweight detangling product to make the process easier and reduce stress on the hair fibres. "Regular, gentle detangling is critical to maintaining the health and beauty of your extensions." - Kosa Salon SF Once detangled, it’s time to focus on protecting the clips before washing. Protect the Clips The metal clips on your extensions need special care to avoid rust or damage: Hold the extensions at the top, keeping the clips out of the water. Use a gentle grip to avoid putting pressure on the attachment points. Apply cleaning products only to the hair lengths, steering clear of the clips. Water Temperature The right water temperature plays a big role in cleaning your extensions without harming them. Here's a quick guide: Temperature Range Effect on Extensions Recommended Use 25-30°C (lukewarm) Ideal for cleaning Use for the main wash Above 30°C May damage fibres Avoid 15-20°C (cool) Seals the cuticles Use for the final rinse "Ensure your sink is squeaky clean, plug the drain and begin to fill it up with lukewarm water - we don't want the water to be too hot or too cold." - Luxy Hair To check the water, test it on your wrist - it should feel neutral, not too hot or cold. This ensures a thorough clean while keeping the hair fibres intact. Washing Steps Once you've detangled your extensions and ensured the clips are protected, it's time to move on to washing. Follow these steps to clean your extensions without causing damage. Shampoo Application Start by diluting a small amount of sulfate-free shampoo in lukewarm water. Hold the weft securely at the top to keep the clips dry, and submerge only the hair portion into the water. Using gentle, downward strokes, massage the shampoo into the hair in manageable sections. Be careful to avoid the clips entirely. Once shampooing is complete, move straight to conditioning to help retain moisture. Conditioning Method Conditioning is key to keeping your extensions soft and hydrated. Apply conditioner from the mid-lengths to the ends, steering clear of the roots. Depending on your needs, you can choose one of the following treatments: Conditioning Type Application Time Best For Regular Conditioner 5–10 minutes Weekly maintenance Deep Conditioning Overnight Monthly treatment Leave-in Treatment After washing Daily protection For an extra boost of hydration, consider using a hair mask. Simply apply the mask, gently coil the extensions, cover them with a shower cap, and leave it on overnight for maximum effect. Rinse Method Once conditioning is complete, rinse your extensions thoroughly with lukewarm water to remove all traces of shampoo and conditioner. Continue rinsing until the water runs clear. To finish, do a final rinse with cold water to help seal the cuticles. If the extensions still feel slippery, keep rinsing until they feel completely clean and free of product. sbb-itb-08feb2f Drying and Styling Natural Drying After rinsing, gently press out any excess water - avoid wringing, as this can damage the fibres. Lay the extensions flat on a microfibre towel in a well-ventilated, shaded spot. To help them dry evenly, detangle with a wide-tooth comb. Let them air dry for about 24 hours. If you're after a natural wave, loosely braid the extensions while they dry. If you're short on time or air drying isn't an option, you can turn to heat styling - just make sure to take the right precautions. Heat Protection Before using any heat tools, always apply a heat protectant spray to shield the extensions. When blow-drying, stick to the lowest heat setting. Hold the dryer about 15 cm away from the extensions, directing the airflow downward from roots to ends. Work in small sections to ensure even drying. "To achieve the most natural blend as possible, we recommend styling your hair extensions after they've been clipped to your hair." - Milk + Blush Once you've finished, let the extensions cool completely before storing or doing any additional styling. For extra care, consider letting the extensions partially air-dry before using heat tools. Between-Wash Care When to Wash Clip-in extensions don’t need washing as often as your natural hair. How often you wash them depends on how you use and style them. Here’s a helpful guide: Hair/Scalp Type Recommended Washing Frequency Oily scalp Every 3–5 wears Normal hair Every 5–10 wears Dry scalp Every 10–15 wears Heavy product use After 1–2 wears After washing, make sure to store them correctly to keep them in top condition. Storage Methods Proper storage is key to maintaining the quality of your extensions and avoiding issues like mould. Always store them completely dry in a cool, shaded spot. To get the best results: Brush out any tangles and place them in a satin or silk-lined pouch. Store them flat or hang them up. Add a light layer of leave-in conditioner before storage. Keep them away from direct sunlight. Daily Care A little daily upkeep goes a long way in keeping your extensions tangle-free and refreshed. Use a loop brush specifically designed for extensions to avoid damage. Apply a small amount of argan oil or leave-in conditioner to the mid-lengths and ends, being careful to avoid the clips. "Excessive build-up in the extensions (products, sweat, dirt, hair spray, oils, etc.) without washing will cause dryness, tangling, and matting." - Shauna Lee, Head of Product Development and Strategic Sourcing for INH Hair Dry shampoo can also be a lifesaver between washes, keeping your extensions looking and feeling fresh. What Not to Do Water Temperature Mistakes Using the wrong water temperature can seriously harm your extensions. Water hotter than 38°C can strip away moisture, weaken the hair's structure, and even alter the texture of synthetic extensions. The ideal range is between 32–38°C to keep them in good shape. Here’s what hot water does to extensions: Strips them of essential moisture Makes them brittle and more likely to break Changes the texture and shape of synthetic hair Weakens the natural protein structure of human hair Stick to lukewarm or cool water when washing your extensions to avoid these issues. Drying Mistakes Overheating during drying or styling is another common mistake that can ruin extensions. High temperatures strip away natural oils, leaving the hair dry and fragile. Here are the safe temperature ranges for common styling tools: Styling Tool Safe Temperature Range Hair dryer 150–180°C Straightener 180–210°C Curling tongs 130–180°C Heated rollers 100–130°C "Applying too much heat to your hair extensions can cause damage, leaving them dry, brittle, and prone to breakage." – CASHMERE HAIR Whenever possible, allow your extensions to air dry. It’s a gentler option that helps maintain their quality over time. Clip Care Mistakes Clips are a delicate part of your extensions, and mishandling them can lead to damage. Avoid these common mistakes: Letting clips get wet during washing Storing extensions while they’re still damp Roughly pulling or yanking on clips during removal Ignoring loose or damaged clips When washing, hold the extensions by the top and submerge only the hair portion in water. This protects the clips while ensuring the hair gets cleaned properly. If a clip becomes loose, have it repaired by a professional right away to avoid further damage to both the extensions and your natural hair. Summary Taking proper care of your clip-in extensions helps them last longer and keeps them looking great. Using lukewarm water and gentle, sulphate-free products is key to maintaining their quality. Here’s a handy checklist to guide you through washing your clip-in extensions: Stage Key Actions Important Notes Pre-wash Detangle gently and protect clips Use a wide-tooth comb, starting at the ends and working upwards. Washing Use lukewarm water and gentle shampoo Keep the clips dry and avoid harsh rubbing. Conditioning Apply conditioner for 5–10 minutes Focus on the mid-lengths and ends, not the roots. Drying Air dry on a flat surface Avoid using direct heat whenever possible. Maintenance Wash every 30 wears or monthly Store in a cool, dry place when not in use. Between washes, lightweight moisturising products made for extensions can help maintain softness and manageability. Always store your extensions in their original packaging, away from direct sunlight, to prevent tangling and maintain their condition. For Silkara™ U Part Clip-ins, here’s an extra tip: avoid using excessive heat while styling. Keep temperatures below 180°C, and always detangle gently with a professional wig comb. These extensions are designed with a breathable wig net and six durable clips, ensuring a secure and comfortable fit. FAQs How do I take care of my clip-in hair extensions to make them last longer? To keep your clip-in hair extensions in great condition for longer, proper care is key. Start by washing them every 15–20 wears using a gentle, sulphate-free shampoo paired with a moisturising conditioner. This helps prevent product build-up while keeping the extensions soft and manageable. Before washing, take a moment to gently detangle them using a wide-tooth comb - this step is crucial to avoid unnecessary breakage. When it comes to styling, try to limit the use of heat tools, as too much heat can weaken the hair. For drying, air drying is the gentlest option and helps maintain their quality and minimise frizz. If you do need to use a blow dryer, stick to a low heat setting to reduce the risk of damage. With these simple care tips, your extensions will stay soft, shiny, and looking their best for longer. What can I do if my clip-in hair extensions get tangled, even after following the care routine? If your clip-in extensions are tangled, start by gently separating them from your natural hair. Use your fingers to carefully work through the knots - this helps reduce the risk of damage. Once you've loosened the worst tangles, apply a detangling spray or leave-in conditioner to make the process easier. For more stubborn knots, divide the extensions into smaller sections and use a wide-tooth comb or a brush specifically designed for hair extensions. Start from the ends and gradually work your way up to minimise breakage. If the tangling is particularly tough, try a warm oil treatment. Apply a small amount of warmed hair oil, let it sit for about 30 minutes, and then detangle gently. Always handle your extensions with care to keep them looking their best for longer. Can I dry my clip-in extensions faster without damaging them? Yes, you can safely speed up drying your clip-in extensions using a blow dryer, but it’s important to keep it on a low to medium heat setting. Hold the dryer at a safe distance to prevent overheating the hair. Before you start, spritz on a heat protection spray to help reduce the risk of damage. If you prefer, you can let the extensions air dry instead. Place them in a well-ventilated area after gently squeezing out excess water with a soft towel. Be sure not to rub or twist the hair, as this can cause tangling or damage. Always handle your extensions with care to keep them looking their best for longer. Related posts How to Trim Hair Extensions at Home 5 Quick Hairstyles Using Clip-In Extensions Synthetic vs Human Hair Extensions: Which Should You Choose? Halo vs Clip-In Extensions: Pros and Cons Guide
Learn more